
Hey guys! How are you doing?
Do you work with local files? Does your company use Office 365 (OneDrive and SharePoint)? In our last Youtube Live we showed how to refresh data on Power BI without a Gateway.
There are basically 3 ways to refresh data in Power Bi Online:
1. Manually refreshing the data on Power BI Desktop and publishing again;
2. Setting an automatic refresh on the online service (PBI Online) or
3. Making an API call to the respective endpoint.
Note that for option 2, we need a Gateway (if the data source is local). In general, the standard scenario is: who works with Dashboard development or is in the company business / financial area doesn’t have permission to install and configure the Gateway, requiring the IT team to perform this step. Our goal is to show you a way to refresh data without needing a Gateway. Note that if the source is online (Google Drive, SharePoint, SQL on Azure, etc.) a Gateway isn’t needed.
In option 3 (use of API), minimal programming knowledge is required. We’ll focus on option 2, okay ?!
Importing data from a folder
To exemplify the data refresh scenario, we will import data from a folder. Remember how to do that? Get data ⇒ Folder ⇒ Copy the path of the folder where the files are located and paste in the requested area ⇒ Ok ⇒ Transform Data.
Now, let’s summarize the steps performed in the Query Editor (Power Query):
1. Add a custom column:
Click on the Add Column Tab ⇒ Custom Column enter the formula presented below and click Ok:
Excel.Workbook([Content])
2. Remove unnecessary columns:
Select the Content and Name columns with the CTRL button pressed and right-click on one of them -> Select Remove Other Columns.
3. Expand data:
Go to the button for the added column and click expand (select only Data) and click OK.

4. Expand columns:
Click on the column button Data ⇒ Expand ⇒ Ok

5. Tranformar dados:
During the live, we quickly performed this step just to get the files treated. Since this isn’t a “standard” step by step and it isn’t our goal today we will not go into the data transformation details of the data transformation, ok ?! If you need details on that, check this live about structuring files with Power Query.
Saving the files
Now, let’s save the .PBIX file in the OneDrive folder.
The cool thing about OneDrive is that you can sync files to your local machine.
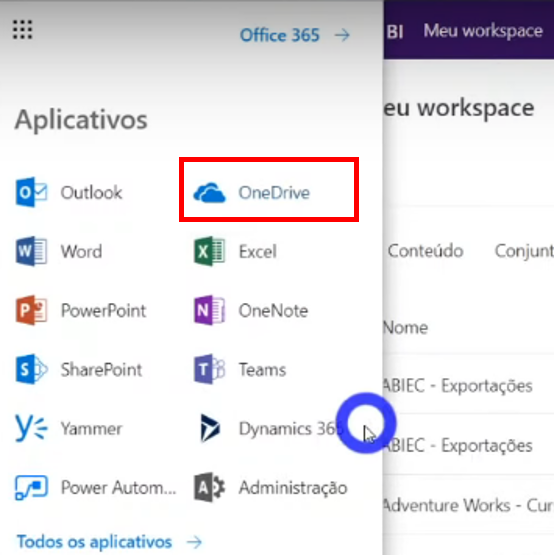
Let’s go to PBI Online and look for the file we saved ?! To do so, go to https://app.powerbi.com, llog in with your credentials and go to the button in the upper left corner. Then click on OneDrive.
Now comes the secret: instead of connecting the files via a local folder, we will make the connection using the OneDrive folder web address. A detail: we won’t need to connect to files individually! We are now able to connect to an entire folder!
So, we have two ways to avoid using local files: using OneDrive or SharePoint. Basically, OneDrive for Business is a ‘disguised’ SharePoint. SharePoint has additional features with the purpose of using and sharing files within teams (collaborative).
OneDrive for Business is just the Sharepoint’s Documents section.
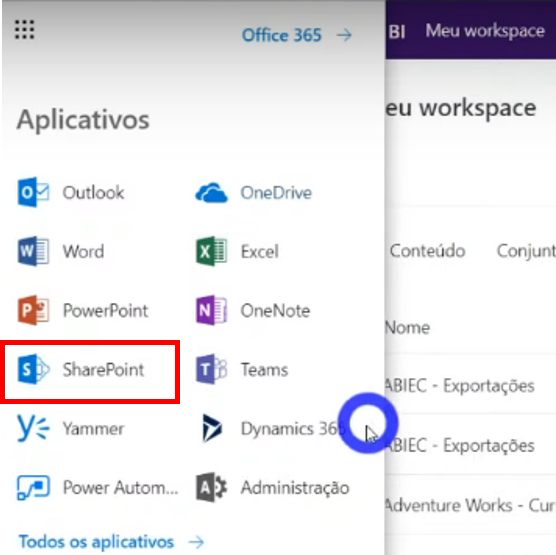
We will now replicate this step in SharePoint. Click SharePoint. Remember that if you have an OneDrive license, you will automatically have a SharePoint license.
After clicking this button, see that a Create site button will be displayed. SharePoint works that way, with sites. When we create a site, we are basically creating a workgroup and consequently, a Workspace is also created in Power BI.
By clicking on the Create site button and filling in the requested information we will have this site created:
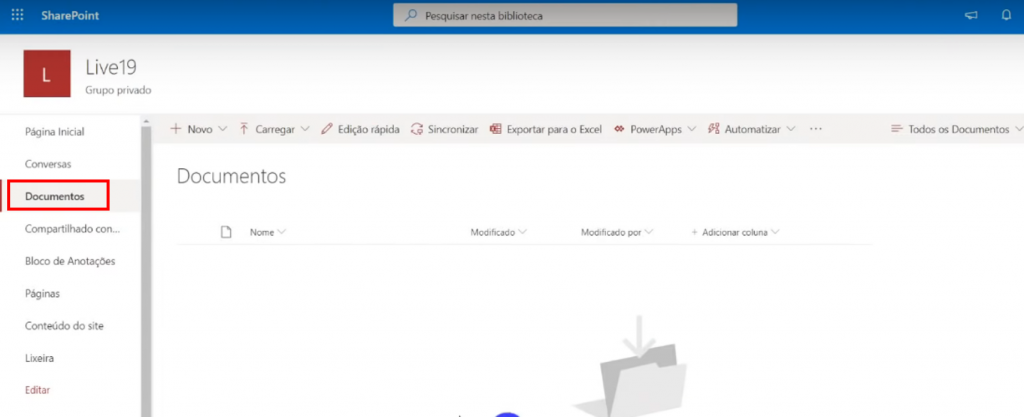
Note that if we click on Synchronize a folder will be created on the local machine. This folder will be directly connected to the website and vice versa! This means if you insert a file in the folder, that file goes is uploaded to the cloud. If you insert a file on that site, it will appear in the folder. Did you like it?! Not over yet!
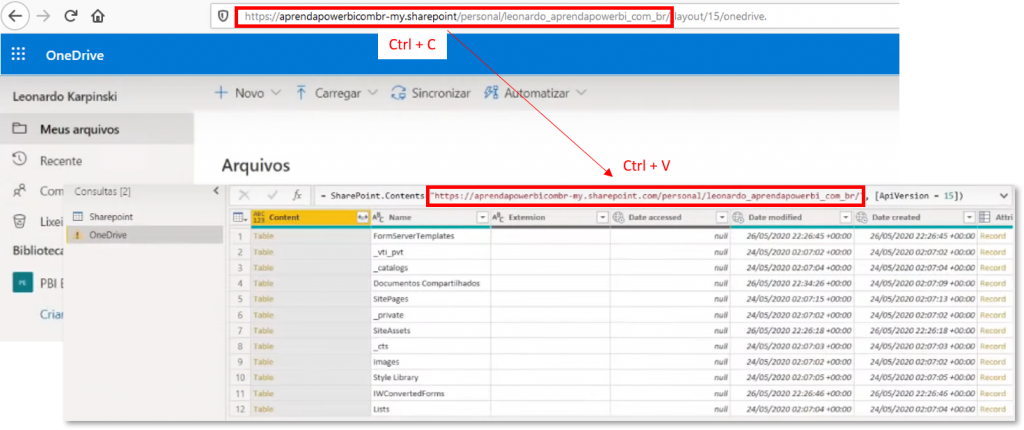
Now let’s copy that folder (with Excel files) into this new folder. When we click Sync, we’ll upload it to the cloud. Now, let’s copy a part of the URL and paste it into Power BI Desktop to replace that Local Folder path we had before.
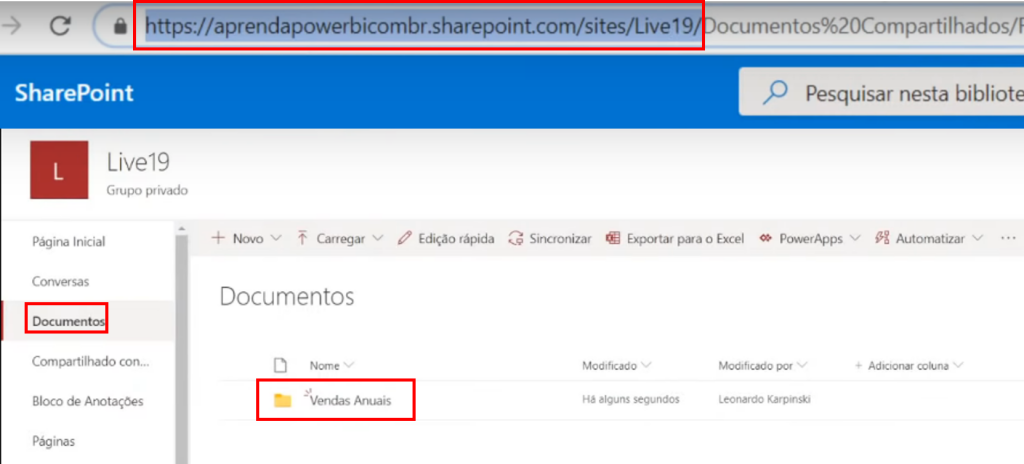
See in the above image that we will copy only the part of the highlighted URL (it goes until the name of the Site we created – “Live19”).
Let’s go back to Power BI Desktop, click on Get Data ⇒ Type Share in the search field ⇒ Select SharePoint folder ⇒ Connect ⇒ Paste the URL we copied ⇒Ok. Ah, if we wanted to do the same for OneDrive, the connection mode in Power BI would be Web, ok ?! Same procedure, copy the URL and paste in the requested field of Power BI Desktop!
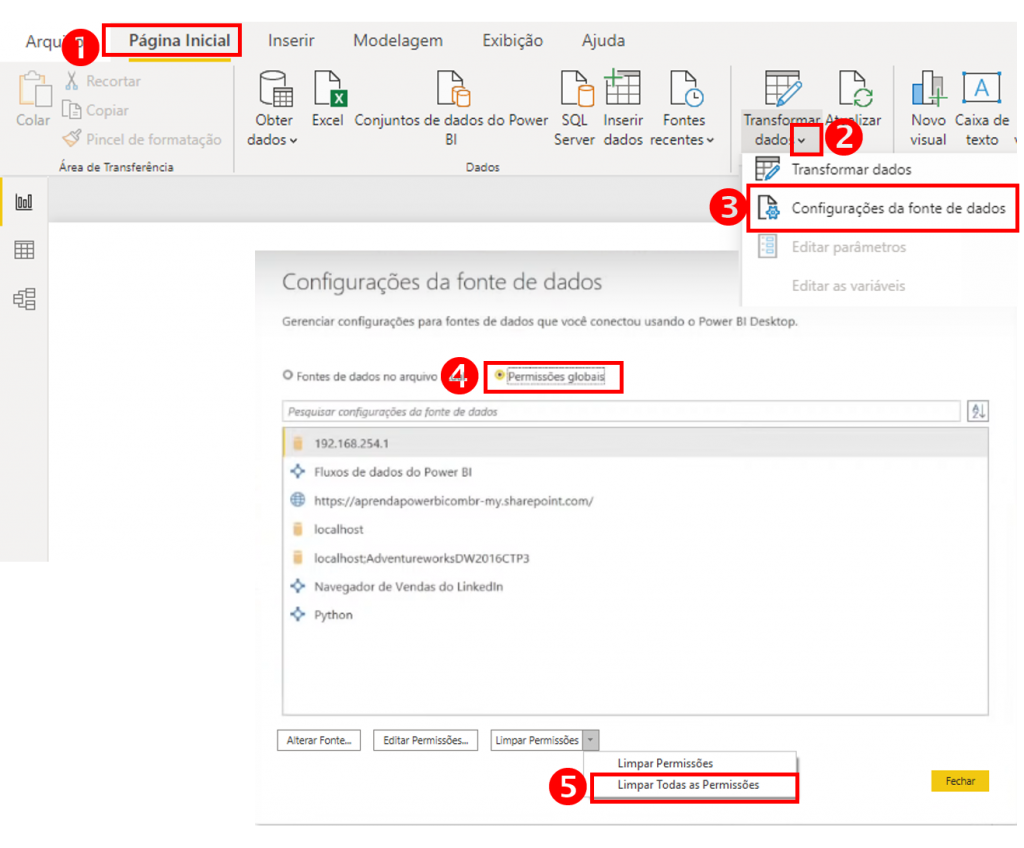
A tip: if you have a credential issue in Power BI Desktop click on the arrow below the Transform Data button ⇒ Data source settings ⇒ Global Permissions ⇒ Clear All Permissions.
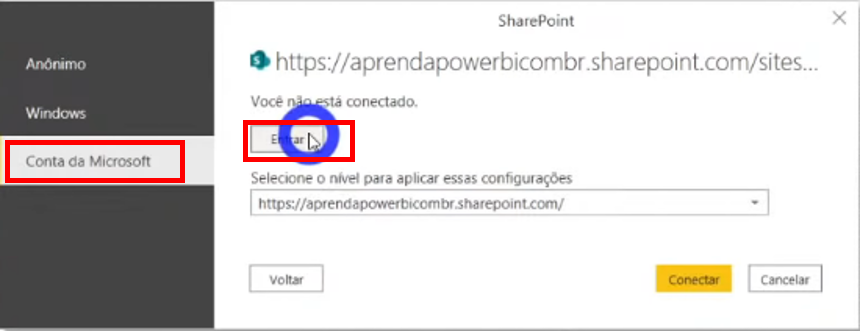
Back to the link we pasted, a window will be displayed so we can connect to SharePoint. Select Microsoft Account ⇒ Sign in ⇒ Enter Office 365 username and password ⇒ Connect.
Then a window with the list of files will pop up (similarly to when we connect to a local folder) and now we must click on Transform Data.
Now comes an issue: all files storaged in that folder from the Sharepoint site will be displayed in the Query Editor file list, regardless of whether we storaged each file in a subfolder or not. This is because when we performed these steps, we used SharePoint.Files function and the path we pasted was stated as an argument. There is no way to connect to a specific folder like this … Remember that the link to the site we paste only refers to the name of the site (“… sites / Live19 /”) ?!
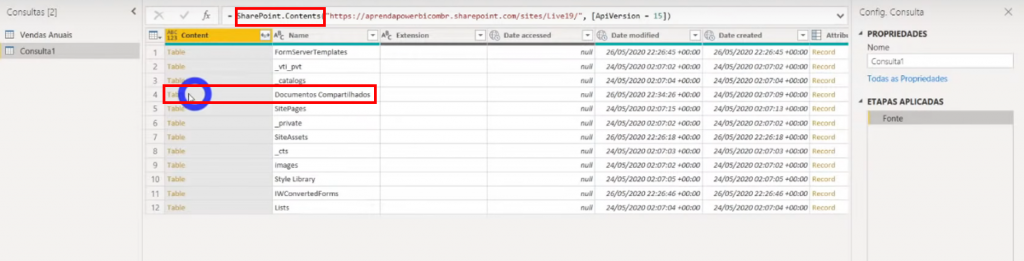
To solve this, instead of using SharePoint.Files function we will type SharePoint.Contents. Then click on Table in the Shared Documents row to expand its folders. Do this until you get the files you want. See the image below:
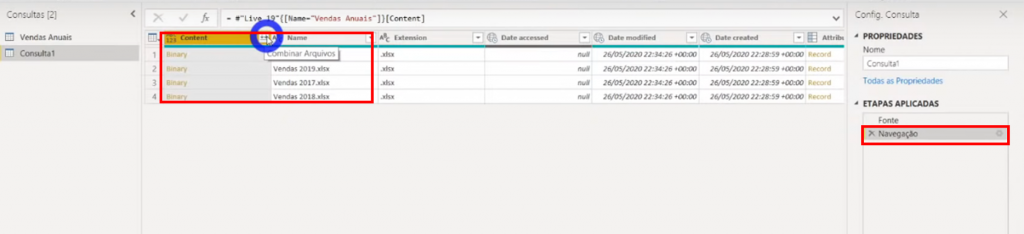
Note that when navigating between folders, only one step was added. We were then able to find the files in a specific folder, check how it looks:
Now, we can publish it! Save the file again and click Publish (Home tab) ⇒ Select the publishing location.
Now, let’s schedule the automatic refresh! To do this, go to Power Bi Online ⇒ Workspaces ⇒ Workplace where you published the report. Look for the Dataset type and click the icon to refresh. Check the error that message that was displayed:
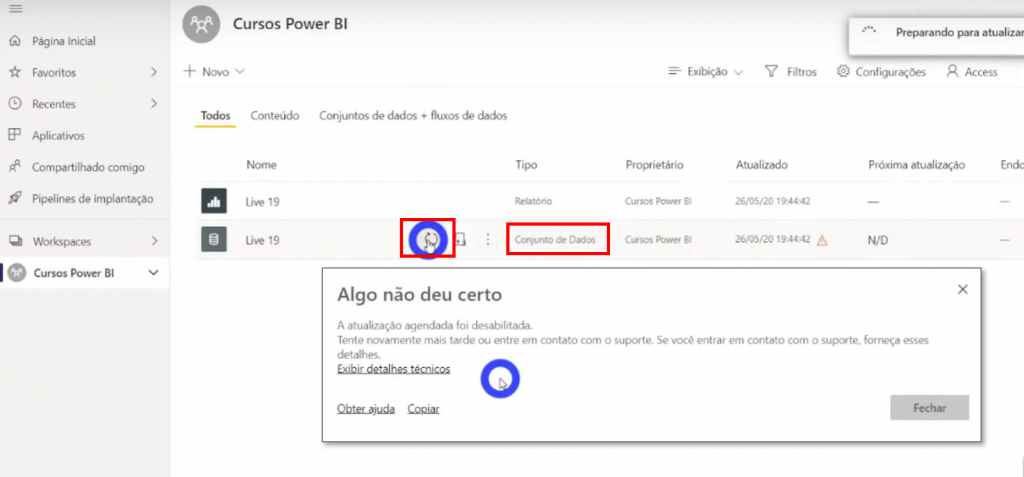
This error occurs because the Power BI Desktop credentials don’t follow along! This means that we will have to log in again to our data source! We will fix this by clicking on the button next to this Refresh (Schedule refresh). Then click on Edit Credentials ⇒ OAuth2 Authentication Method ⇒ Connect.
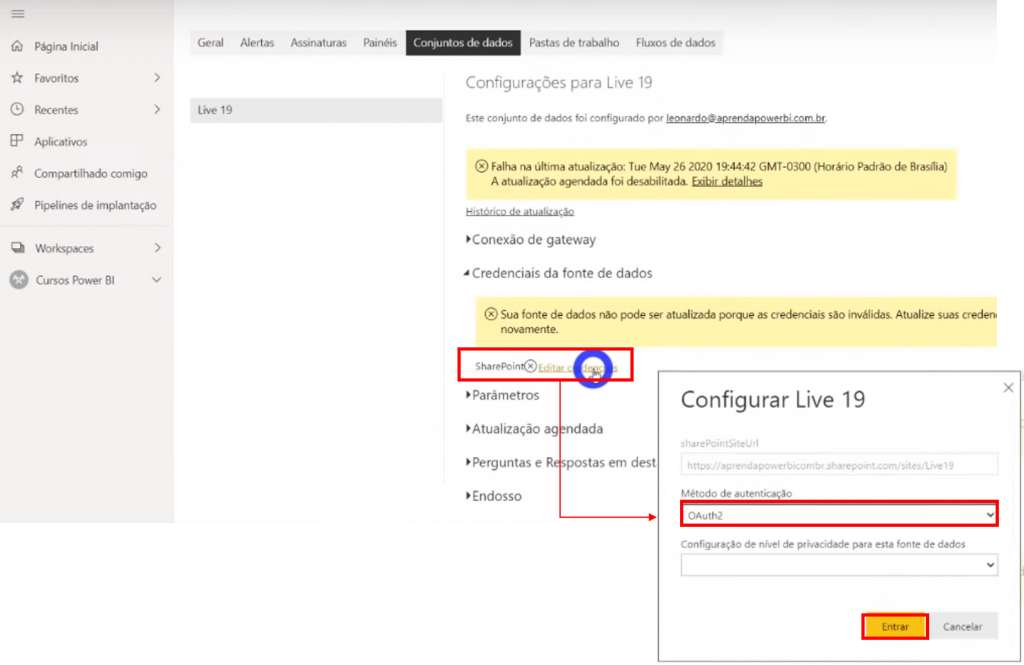
After logging in with your account, the Scheduled refresh option will be available as shown in the image below:

Note that if we go back to that refresh button, we will see that the error message will no longer be displayed! Success! Okay, now we can schedule refreshes and/or refresh the data! Cool huh?!
If we want to connect to our data source with OneDrive, just go to OneDrive, copy the URL of the location where the files are located, and paste in the SharePoint.Contents function argument in the Query Editor. We won’t need to change the SharePoint.Contents function, see:
Then, the same step by step: select Microsoft Account ⇒ click on SharePoint (the Login button will not appear as in image 8 because we are already using SharePoint, ok ?!) ⇒ log in with your Office 365 account.
Questions and answers
Now let’s list some cool questions made during the Youtube Live.
Are those Settings and Privacy options (in that authentication window) good for anything ?!
Live Participant
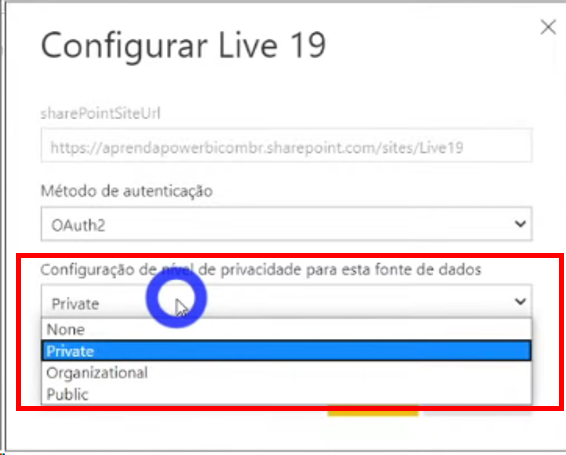
In general, if the data source belongs to your company, select the Organizational option. Now if the source is the web (data from an internet site for example), select Public, otherwise you will not be able to connect to the site. What if the data source is private (only you or only certain users can access it) ?! Then, select the Private option. If you need to better understand the difference between them, click here.
Is that maximum limit of 8 automatic refreshes per day still valid for data import methods from OneDrive and SharePoint ?!
Live Participant
Yes! It remains limited to 8 refreshes a day!
For OneDrive do we need the paid version?
Live Participant
Yes! Remember that if you have Office 365, then you already have OneDrive.
O Douglas Martins commented:
Leo, it compensates to pay for the Premium plan. I pay 35,70 and have access to SharePoint, regular OneDrive and OneDrive for Business. Basically beer money kk
In the case of connecting a OneDrive file (a spreadsheet), publishing the PBI and sharing a public link, the public link does not refresh why ?!
Oliveira, Gledson
It updates. But it takes 30 min or even 1 hour to update.
Tables imported from a relational model and organized in Power BI (Power Query) in the star model, would it have the same performance as tables imported directly from a database in the star model?
Santos, Danilo
It depends on how the tables will be imported and the complexity of the data manipulations made. With Query Folding, if you right-click on the last step applied in the Query Editor and click on View Native Query, you can guarantee that you were able to take all these transformations straight to the source. Of course, bringing ready data from the source is generally more guaranteed, okay ?! Ah, in the full course I explain better about Query Folding. You can also take a look at this video.
Well folks, that was the content of Youtube Live # 19! See you soon!
Regards,
Leonardo!