
Hey guys! Tell me: Do some of your clients have the same data structure and you want to know how to share a single report with all of them? Want to better understand Power BI’s sharing options? Today’s content is all about that!
This article’s main focus are those who have clients with equal databases – clients with the same ERP, for example, where each has a database or a specific file. It’s quite annoying to having to share a different report for each client, right ?! Let’s show you how we can simplify this!
First, let’s talk about the available ways of sharing. To deliver a solution to your client, you have two options:
- Publishing reports on the web (public link)
» Advantage: no license required (100% free)
» Disadvantage: security related - Publishing on your domain by creating an email account for each client (ex: cliente1@yourdomain.com.br)
» Licensing: Pro for who publishes and Pro for the client ($9,90 per month)
» Disadvantage: related to the control of many users or the client finding it bad to keep access outside its domain - Publishing to your domain and sharing with the client through its email account (cross-domain sharing)
» Licensing: Pro for who publishes and Pro for the client
» Disadvntage: the customer will have two accesses to Power BI - Using Power BI Embedded A
» User Licensing: Pro is required for those who publish
» Capacity Licensing: Embedded A (Azure) Plans
» Disadvantage: you need a BOM programmer because it requires technical development knowledge
Here is a sketch:

Oh, we didn’t mention Power BI Premium, ok ?! It’s much more expensive! Another thing: as it’s a more complex solution, we won’t go into details about Power BI Embedded. We can talk about this topic in another article, ok ?!
If you want to know more details on the PBI Embedded features (prices, limits, etc.) Click here. If you want to know more about Power BI Pro, click here.
Initial Stage
Creating parameters
Let’s simulate a connection on a demonstration database we have in SQL Server. After clicking Get Data → SQL Server Analysis Services Database → Table Selection (in our case it’s called Customer), we’ll also need to create 2 parameters for the server name and the customer database name.
We will call the first parameter ServerSQL – imagine that each client has a structured database exactly the same as this localhost that we set for Current Value:

The second parameter will be called DataBaseSQL, see:

Now, we must edit the M code for the connection to the Customer Table. Click on the table and then on Advanced Editor and make the following changes (adding the name of the parameters we created):
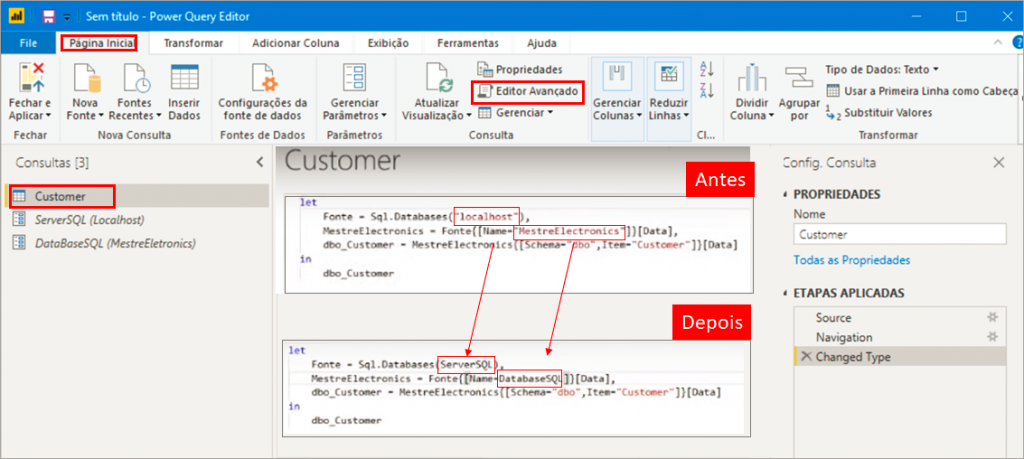
Note that with Excel, we could do the same procedure to create parameters and change the excerpts of the M code (Source and Table).
In the end, click Close and Apply.
Creating a Workspace for each client
We must now create a Workspace for each client on Power BI Online. Access the Power Bi sign-in page with your credentials and follow the steps:

Just go to the left side menu, select Workspace, and Create a Workspace. Enter the client’s name and then click Save.

Now, let’s go back to Power BI Desktop and click Publish. Select the client’s Workspace to publish the report, see:

Note that you will have to repeat this publishing procedure for each client and the good news is that you can automate this, for example, using scripts in Powershell. Cool, right ?!
Back in Power BI Online, we will need to edit some settings. In the Workspace of each client, we must edit the same parameters we created in Power Query. Look:
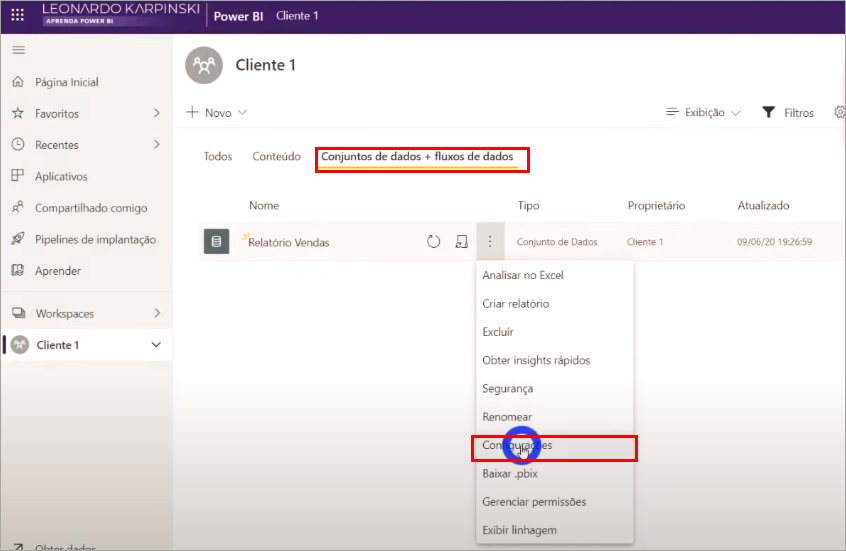
Now, look for Parameters and change the names below (at the end, click Apply):

Remember to set the Gateway Connection for each client too, ok ?! You will only need to do this the first time you publish
Finally, we must refresh the Dataset and Schedule automatic refreshes.
Publishing to Web (Free)
Now let’s simulate publishing on the web. This is our first option, where we don’t need to pay anything. However, this option presents a risk of the link being leaked. To do this, in Power BI Online, go to the report you created → Click the three-dot button → Embed → Publish to web.

Note that after that, PBI will generate a link so you can share it with anyone and also an HTML code for you to use on your website or blog. Look:

You may be thinking: If my website/portal has a login and password system, sharing would be safe since only the user would have access, right ?! – Wrong!
Imagine you have a website and add this HTML code to make the report available on it. Anyone who accesses it can right-click on the page and access the frame source code:

When you click View frame source code, the link to the report will be available and the person who has access to it will be able to share it with anyone. Risky right ?!

Publishing to your domain
In the second sharing option, you buy a PRO license for each client in your domain. This means, even if the client already has PRO access in his company, you will necessarily need to grant another one, this time in your domain. In this solution you must create a user for each client in Power BI Online, like this:

After adding the users, you must configure the email (cliente1@yourdomain.com.br) and the password of each one.
Finally, just share the report you created with each client:

See that we are only sharing the report with the client, which means, we are not providing access to our Workspace so the client will not be able to download the .PBIX file, ok ?!
Shall we move to the next sharing option ?!
Cross-domain sharing
In this option, instead of adding a user as shown on image 14, let’s just click on share and add the client’s email (the client must have a PRO license):

An important thing: this sharing option needs to be enabled in Sharing and export settings, ok ?! Just go to the Administration Panel and leave this option enabled, as shown in the image below:

The client will receive a link to access the report in the email inserted above. Note that even if the client receives the shared link in the email, it will only be able to access the report if with a PRO license. See the message that is displayed when clicking the Shared report:

Karpa, when sharing between different domains, could the client have full access to the report data? Or is it just visualization?
P., Raphael
Yes. To enable this, just go to the Administration Portal (by clicking on the PBI Online gear button) and click on enable on this topic:

With this setting enabled, the customer will be able to collaborate with you, creating Workspaces, editing, and managing content, etc.
One more thing: we also have the possibility (with a PRO account) to incorporate the report on our website or blog. To do this, simply access the report by clicking on the report name:

Then, just click on the 3 dots → Embed → Site or Portal. Look:

Now, the same procedure we explained for web sharing: just copy the HTML code and paste it on your Site or Portal.

Note that, different from the free sharing option on the web (public link), in this option (with the PRO account), when embedding the report on your website or on the client’s website, the user will only be able to access it after performing the login with the account (PRO). See how it’s displayed on the website:

Remember that to securely share, whether on your website, SharePoint Online, Teams, etc, the same rule applies: you can only share and view the report with a PRO account, ok ?!

Well guys, the content of this article was based on Live # 21 Mestre Power BI – How to share a SINGLE report with ALL your clients.
I hope you enjoyed it! See you soon!
Regards,
Leonardo.