
Hey guys!!! How are you doing? Today’s post is about Youtube Live # 16 !!
In Live #16, we mainly talked about topics related to consulting. This topic is very important even for those who are not currently working as consultants, as it may be a great future opportunity.
Então, vem comigo para aprender sobre:
- Types of work with Power BI and challenges as a consultant;
- Ways of connecting and updating clients database;
- Azure SQL Database
Types of work with Power BI and challenges as a consultant
Before talking about connection and update, I think it’s important to disclose the types of Power BI projects and talk a little about the challenges as a consultant. This is important, as not everyone knows the full range of opportunities in the community. In general, there are 3 main types of Power BI Projects:
– Companies Internal projects: this is the most common case where the professional is hired to work as business analysts (financial, sales, controllership, engineering, logistics, etc.), BI analysts (if there is an area of IT or BI), and internal consultants.
– External consultancy: this is the second most common case, in which the professional who works with BI has external clients and carries out projects in different companies.
– Product development with Power BI: this is a consultancy job for internal clients (usually recurring). An example would be a systems company that wants to provide reports developed in Power BI to its customers. Another example is an accounting firm that wishes to provide its client with a report developed in Power BI. And finally, embedded Power BI solutions.
If I were to rank (without data, based on the contact I have with the community) I would say that most professionals work on internal company projects, followed by external consultancies and lastly with product development.
The scenario where in-house professionals migrate or think about migrating to consulting after gaining experience is quite common.
When it comes to migrating, a question remains: “What challenges will I face as a consultant?” To help you, I made a list of some problems you might encounter in this type of career:
Having access to information:
- Understand your client’s business: You will need access to people and information to understand your client’s business before starting developing a solution. Without this understanding, you may spend a lot of time to deliver or end up not delivering the solution expected;
- Having access to the client’s server: this item depends a lot on the relationship with the client or who is responsible for the client’s system permissions;
- Having access to the client’s database: just like the server, as a consultant you need database access permission in order to develop the solution;
- Understanding database tables: How to do this? There are a few options. The first one is to have someone within the client who understands the database and supports you with the task. Another way is to access the database dictionary. You can also put up some time in understanding, and then charging for this service.
Sharing:
- Align the type of sharing: to do so, you may have a user within each client’s domain and share. However, there are several other options and this must be aligned with the client.
Gateway:
- Gateway connection for refreshing: being able to install and configure the gateway on the client’s server (it involves a lot of relationships with IT). This matter can demand hours of work and a lot of alignment with the client’s team, which means, attention to it!
| Important: All of this must be included in the proposal; therefore, be careful when quantifying project hours when pricing and do not shoot yourself in the foot! |
To make a good work hours quantification it’s necessary to have great requirements mapping with correct questions to the client! Two essential actions: talk to IT people and have an example of sample data. As you gain experience (after the 4th or 5th project) you will have a better understanding of how this process works.
In a typical project, the independent consultant charges between R$ 100.00 – R$ 200.00 / h of work on the project. As for non-independent consultants, it depends on the seniority range, on the scale:
- Junior: between R$30 and R$40/h;
- Mid-level: between R$40 and R$55/h;
- Senior: between R$55 and R$100/h.
And how long will a project take? This depends on each project (even the mood of the people involved in approving the permissions, for example).
Here is a cool challenge for those who are in the Data Science field. Create a machine learning model to predict the working time of a BI project. It would be interesting right?
Ways of connecting and updating clients database
I always like to remember the steps of the Power BI process:
Production OLTP database → Staging → Data Warehouse (DW) → Power BI Desktop → Power BI Online
Is this the most used process? No! In the most adopted process, people skip staging and go straight to the production area, remaining:
Production OLTP database → Power BI Desktop → Power BI Online
My opinion on that? I have already developed a project directly into the production environment and experienced taking down a client database so I never repeated this mistake again.
The safest way to develop the project is to have access to a copy/backup of the client’s database (staging area). I wouldn’t say you are required to have a Data Warehouse (DW), but the staging area is essential (it greatly mitigates the risk)! So, I recommend that even for small projects you have the staging environment so you can develop at will and without the fear of affecting the database.
I’ll take the opportunity to share some common project mistakes:
Use the production database, instead of staging:
- This staging database can be in the client’s environment, he doesn’t need to send you the backup if it doesn’t want to.
- If the customer doesn’t want to create the DW and also doesn’t want to maintain the daily staging feed, you can then change the connection to the production environment through parameters created in Power Query, after completing the development!
Take all the tables history for development:
- You can also use parameters to restrict data in development. I present this in detail in the incremental refresh live (Live # 7).
As a consultant, in order to access the client’s server environment we have a few options:
- Remotely using a machine on the client’s network
- Using your own machine and accessing the Database via VPN
- Using a Data Warehouse
Remotely using a machine on the client’s network
This method is quite common and we access the machine remotely via WTS, for example. But how to do that? It depends on the permission and must be aligned with the client (ex .: VPN, through IP, open machine to login).
In this option, the development flow would look like this:
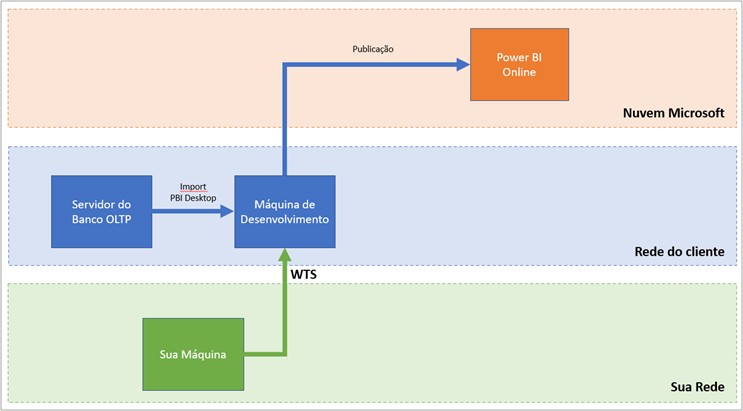
Image 1: Development flow in case of remote access
In our example, imagine that we are remotely accessing the client machine (which must have Power BI Desktop installed) via WTS. On this machine, we perform data import and development. Finally, we publish it.
| Important: Ask for a database read-only user. Avoid the user with change permission! This lessens risks in case the client has a problem with the database. |
With remote access to the machine, we access the client database viewer (in this case SQL Server):
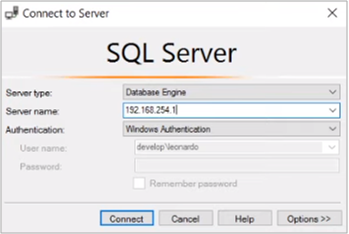
Image 2: Access to the datavase on the client’s network
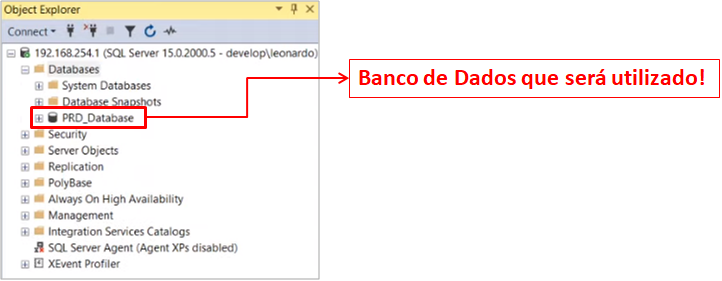
Image 3: Database visualization
Steps:
Remotely connect the client machine → Open the viewer → Provide login credentials → View the database
Then, we enter Power BI Desktop (in the client’s environment) to get the data from SQL Server:

Image 4: Getting data from SQL Server in Power BI
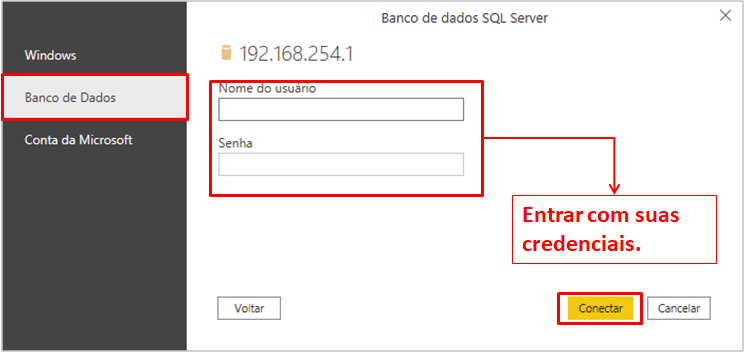
Image 5: Entering Credentials
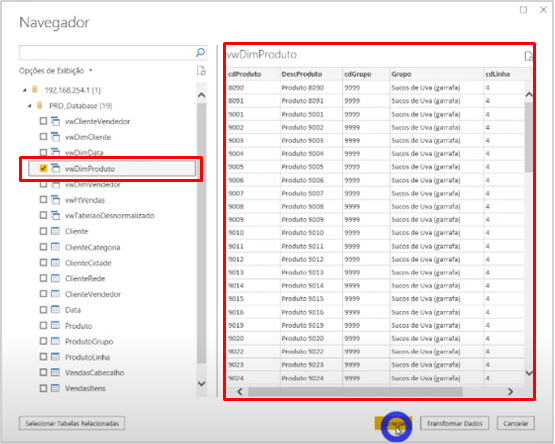
Image 6: Table Preview
Steps:
Open Power BI Desktop → In "Home" click "Get data" → Select "SQL Server database" → In "Database" enter the credentials → Select the database to import
After loading the data, we will create two sample visuals to publish the report:
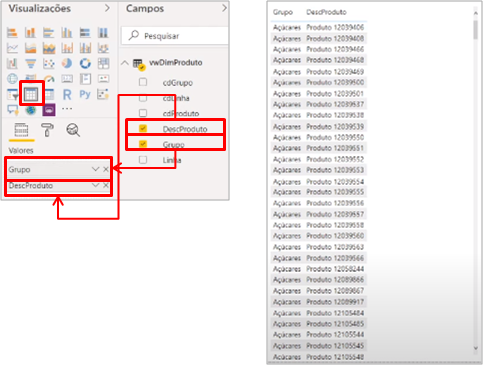
Image 7: Table Visual
Steps:
In the visuals tab click on "Table" → Drag "Grupo" and "DescProduto" to "Valores"
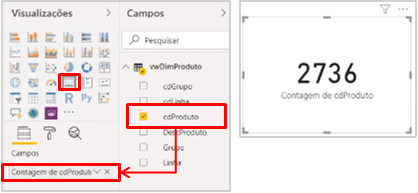
Image 8: Card visual
Steps:
In the visuals tab, click "Card" → Drag "cdProduto" to "Campos"
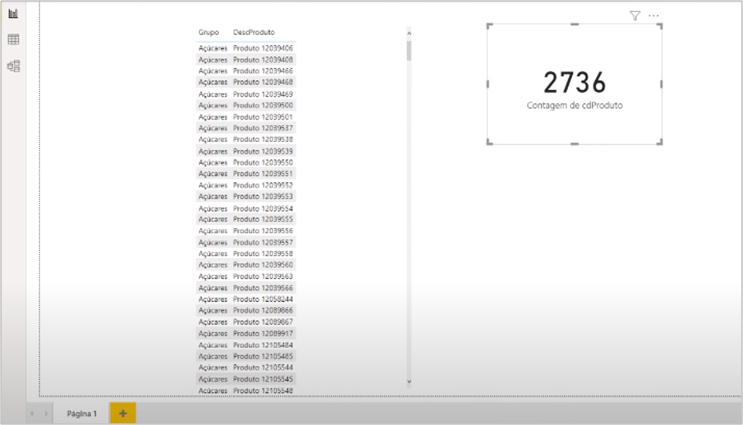
Image 9: Page 1 with Table and Card visuals
And then, we save the file:
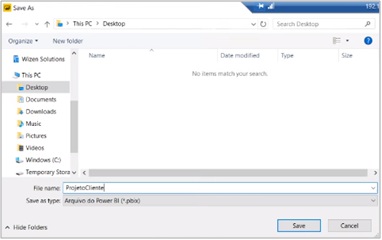
Image 10: Saving the file
To optimize the update process, we need to create 2 parameters (Server and Database) for the data source in Power Query:

Image 11: Accessing the Power Query environment
Steps:
In "Home" click on "Transform data"
In Power Query, we go to “Manage Parameters” and create a parameter for the Server and another one for the Database:
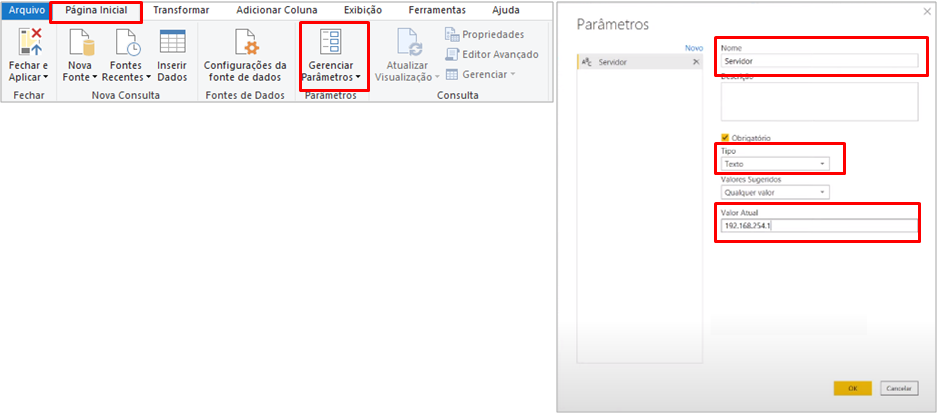
Image 12: Server (Servidor) Parameter
Steps:
In "Home" click on "Manage Parameters" → Configure "Name" and "Current Value" according to Server information → "Type" = Text
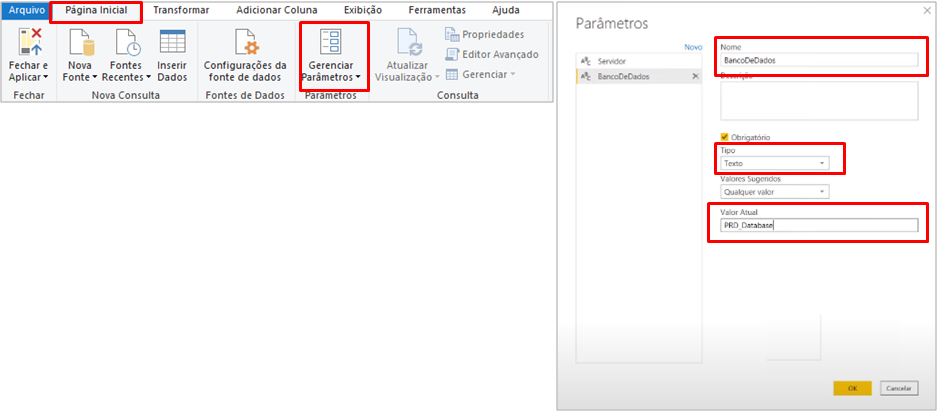
Image 13: Database Parameters
Steps:
In "Home Page" click on "Manage Parameters" → Configure "Name" and "Current Value" according to information in the Database → "Type" = Text
With the parameters created, we change the data source settings:
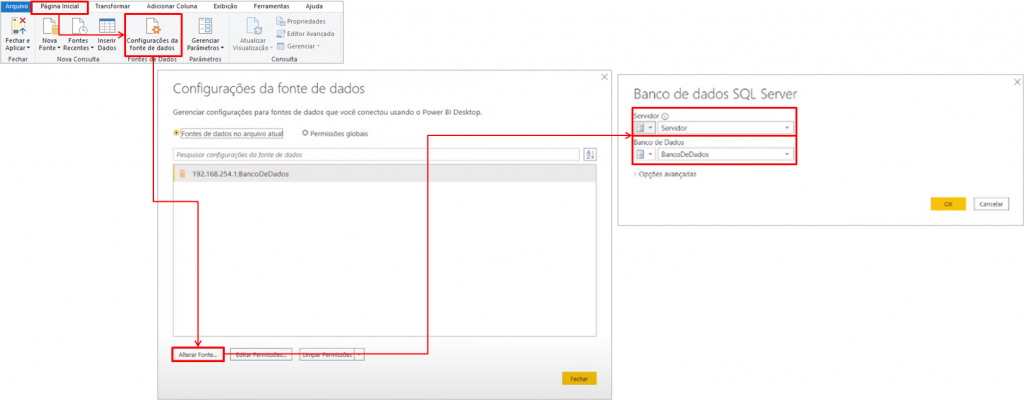
Image 14: Setting the database
Steps:
In "Home" click on "Data source settings" → Click on "Change source" → Change the server and database source for the created parameters
And then, change the PRD_Database data source in the advanced editor, because it is fixed and we need it dynamically (parameter):
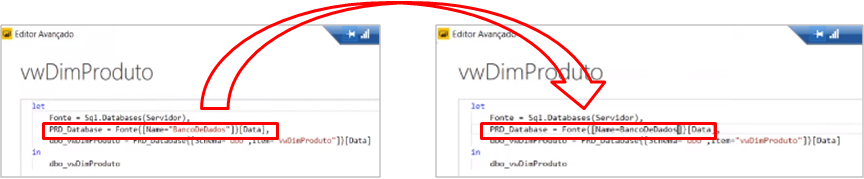
Image 15: Change in Advanced editor
Steps:
With the query selected, click on "Advanced Editor" → Change the "BancoDeDados" (in parentheses, as it is fixed as text) to BancoDeDados (without parentheses to reference the created parameter)
After finalizing the data source setting, we need to enter the credentials for access as we did to obtain the data:
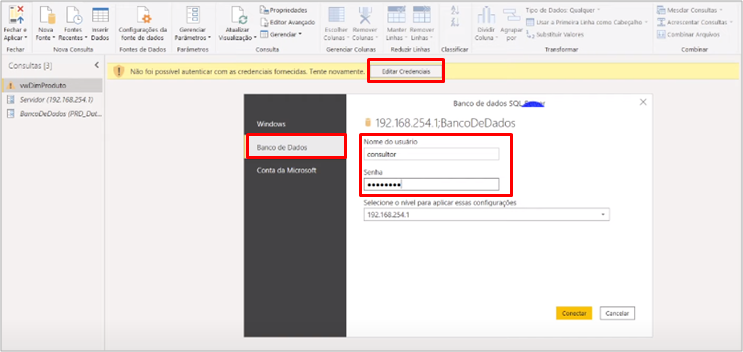
Image 16: Entering Credentials
Steps:
Click on "Edit Credentials" → In "Database" inform the credentials
Close and Apply to return to the Power BI environment:
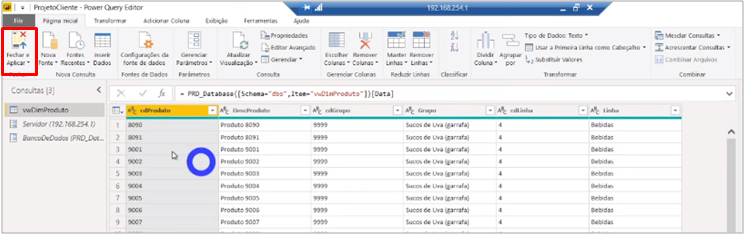
Image 17: Error-free data display after changing parameters
Finally, we save the .pbix file for publicshing.
Using your own machine and accessing the Database via VPN
In this option, the development flow looks like this:
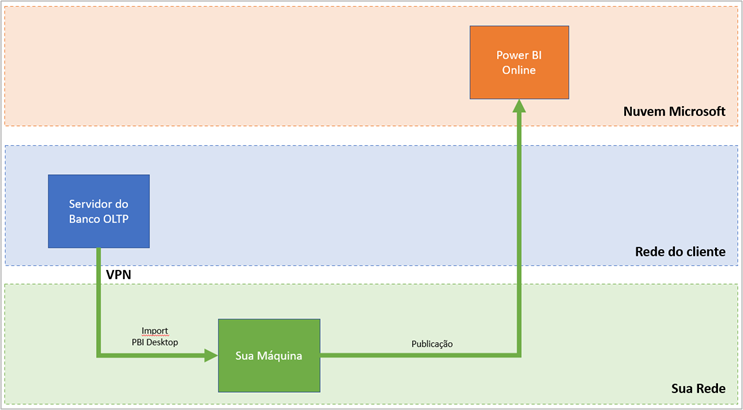
Image 18: Development flow
To perform this example, I will upload the project we created (client environment) to One Drive and transfer it to my machine (consultant’s environment):
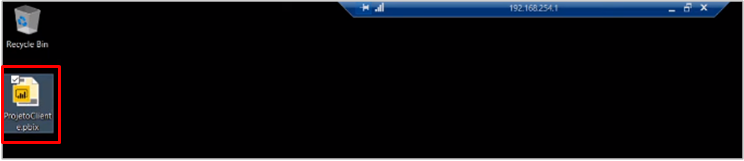
Image 19: File (client environment)

Image 20: File on the cloud service
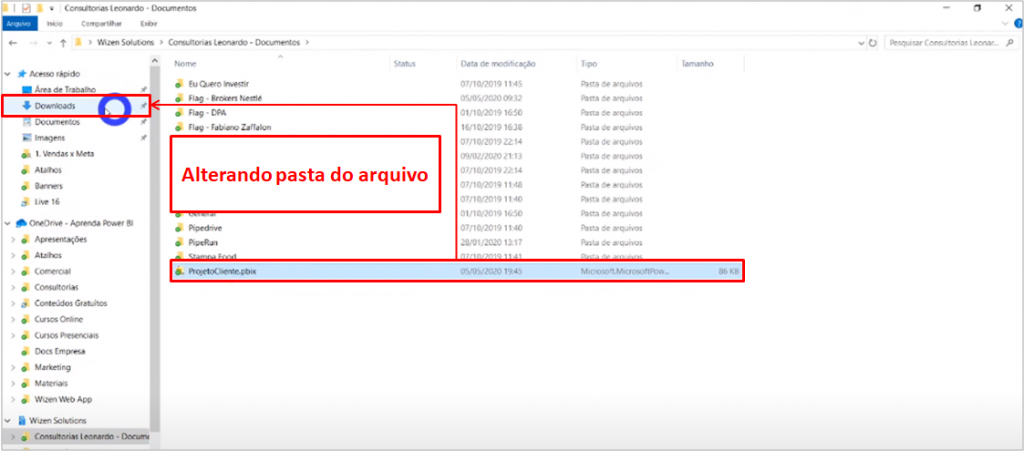
Image 21: Transfering file to the folder
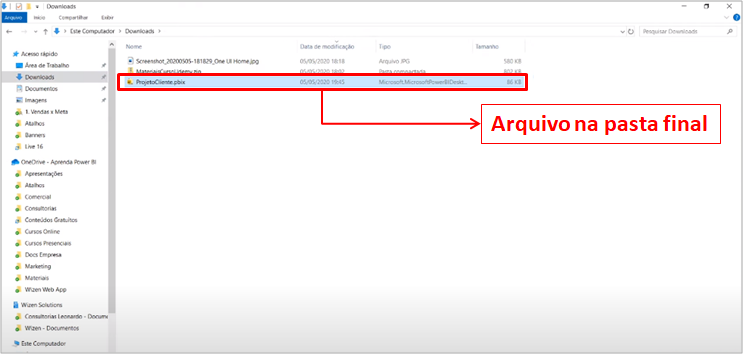
Image 22: Project file in final folder
Steps:
Select the project's .pbix file created in the client's environment → Upload the file to the cloud → Download the file to own machine (consultant's environment)
The file is now on the consultant’s machine. Let’s open to view:
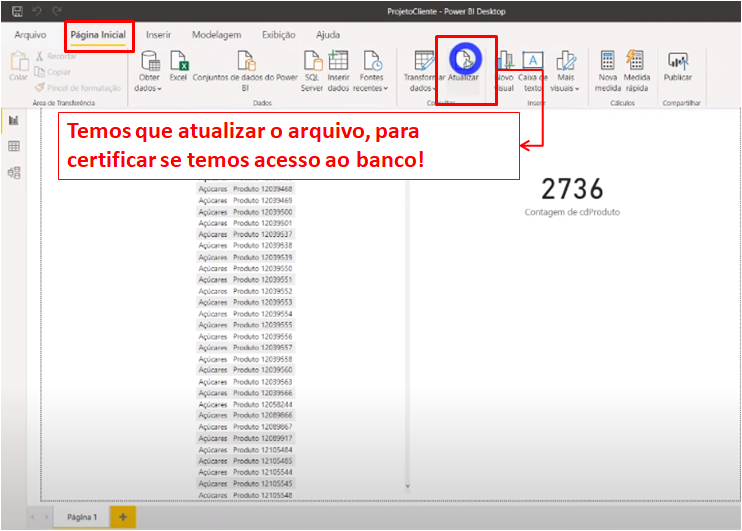
Image 23: Project (consultant’s machine)
The file shows the information, but if we refresh it, credentials will be asked:
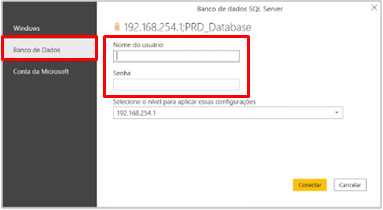
Image 24: Entering Credentials
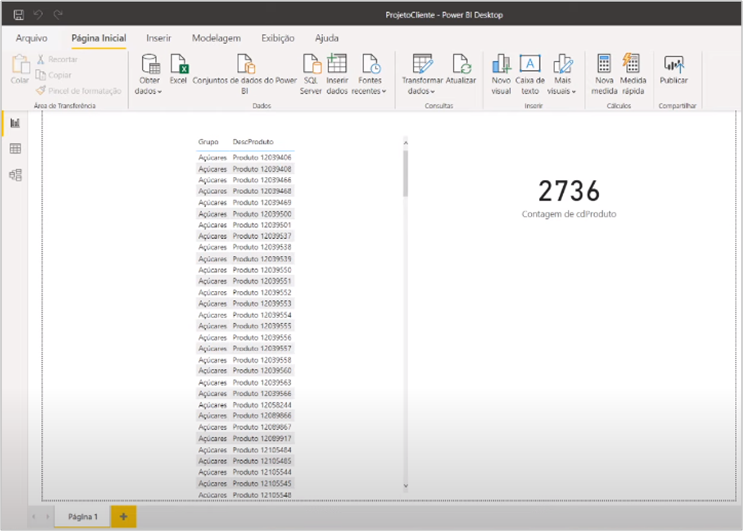
Image 25: File successfully refreshed
Steps:
Open the .pbix file → In "Home" click on "Refresh" → In "Database" enter the credentials
Now, imagine that the client provided a database backup and we can set the staging for development (consultant’s environment). Let’s open the database file sent by the client in SQL (consultant’s machine):
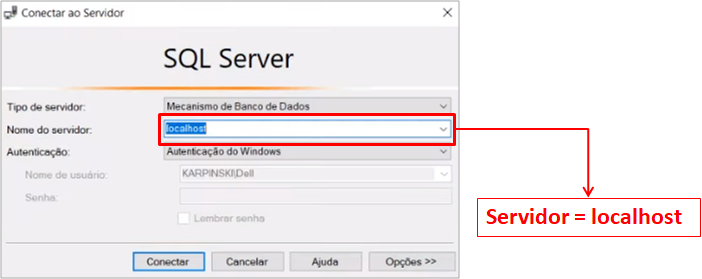
Image 26: Connecting to SQL Server (consultant’s machine)
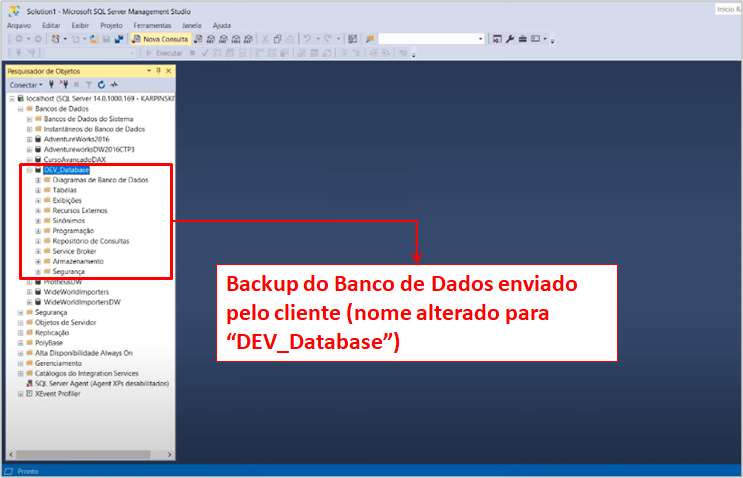
Image 27 : Backup database for staging
Steps:
Open the database file sent by the client → Open in "localhost" → View database (note that the file name is different from the production environment)
Como vamos desenvolver o projeto com base nesse arquivo de staging, precisamos alterar os parâmetros da fonte de dados no Power BI:
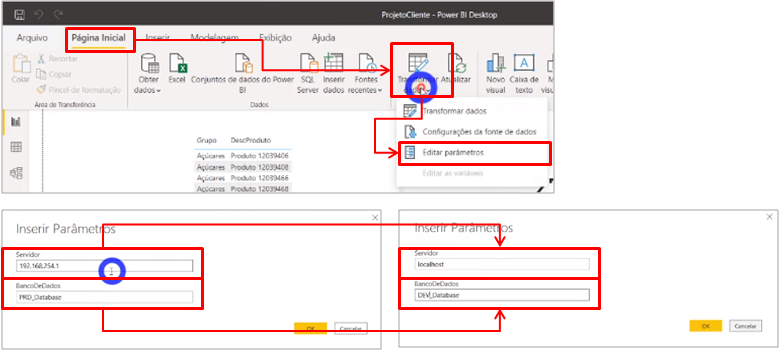
Image 28: Editing parameters in Power BI
Steps:
In "Home" click on the arrow under "Transform data" → Edit parameters
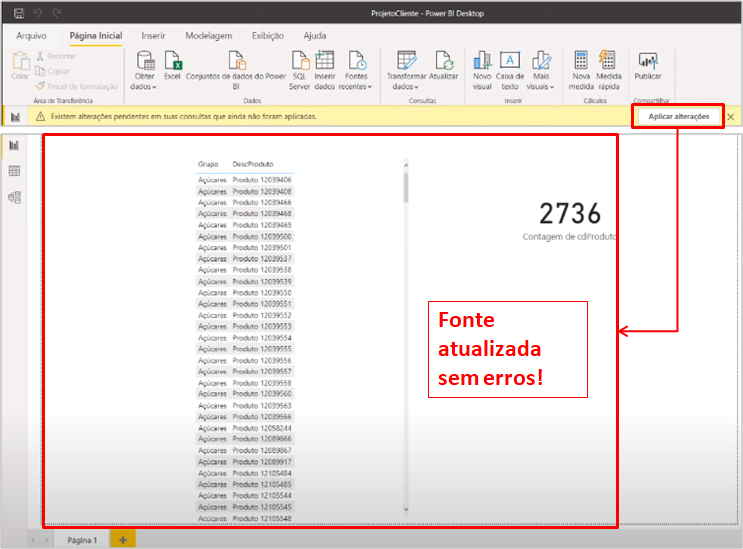
Image 29: Error-free report after source update
In the “DEV_Database” file, we will make a change by removing some product items, which means, it will be different from the database file on the production environment:
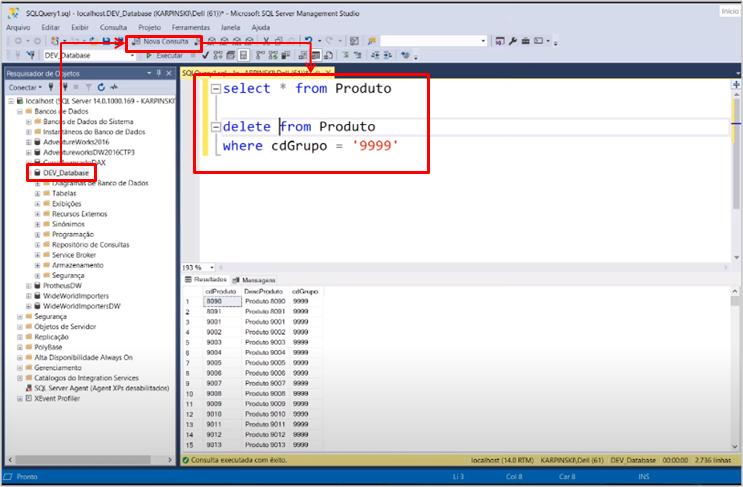
Image 30: Database change
Steps:
Open SQL Server → Select the database → Click on "New Query" → Make the query → Save file
Query:
select * from Produto
delete from Produto
where cdGrupo = '9999'
Note that 796 lines were removed:

Image 31: Change result
Let’s refresh Power BI and check the information synchronization:
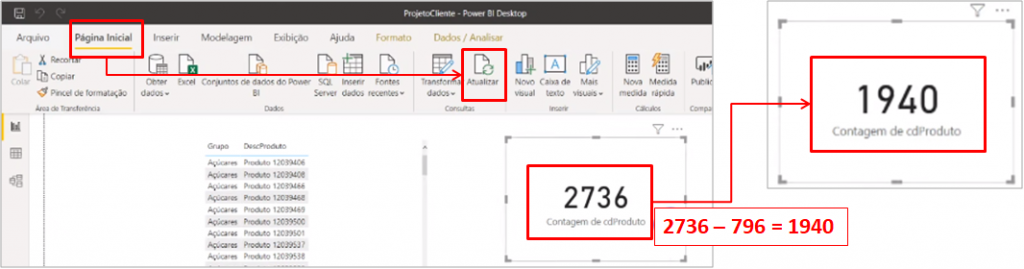
Image 32: Refreshing the Power BI file
Steps:
In Power BI, under "Home" click "Refresh"
Did you notice the change in card value? The card value was 2736 and changed to 1940 (2736 – 796 = 1940), which means, the file was successfully refreshed! With the update, we save our file and publish it to the Power BI Online environment:
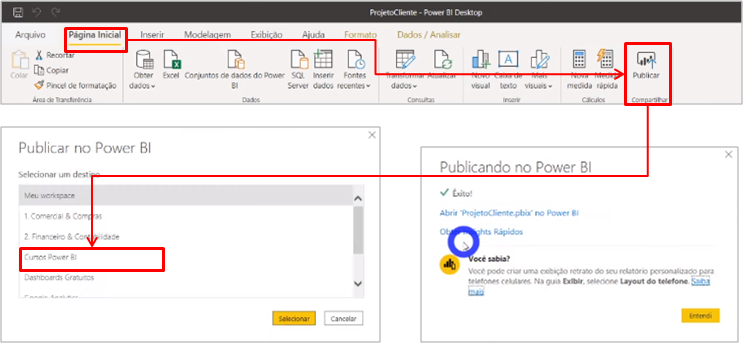
Image 33: Publishing the file
Steps:
In "Home" click on "Publish" → Select the workspace where the report will be published
The development was made on the consultant’s machine, however in Power BI Online the data update must come from the client’s server! Hence the reason for using the parameters, which will make this process much easier.
To refresh the report in Power BI Online with the client’s server information, we need a gateway connection. Let’s install a standard gateway mode in the client’s server environment, example:
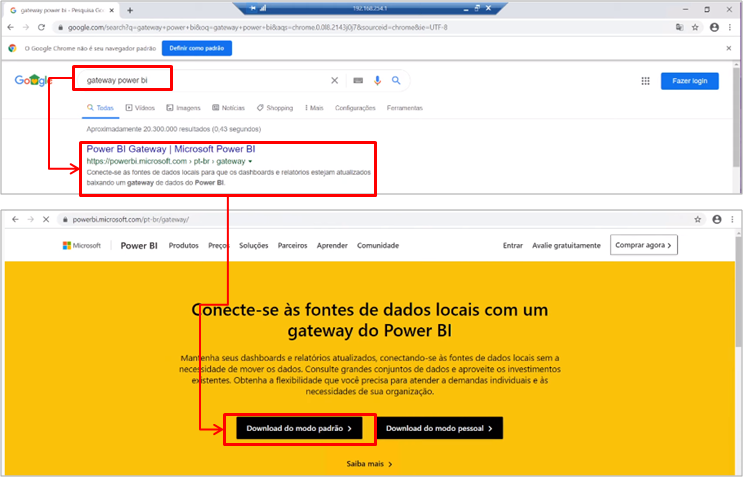
Image 34: Downloading a standard gateway through web browser
Steps:
Open the browser (in the client environment) → Search "gateway power bi" → Open the first link → Download the standard mode
After finishing downloading the file, we install it:
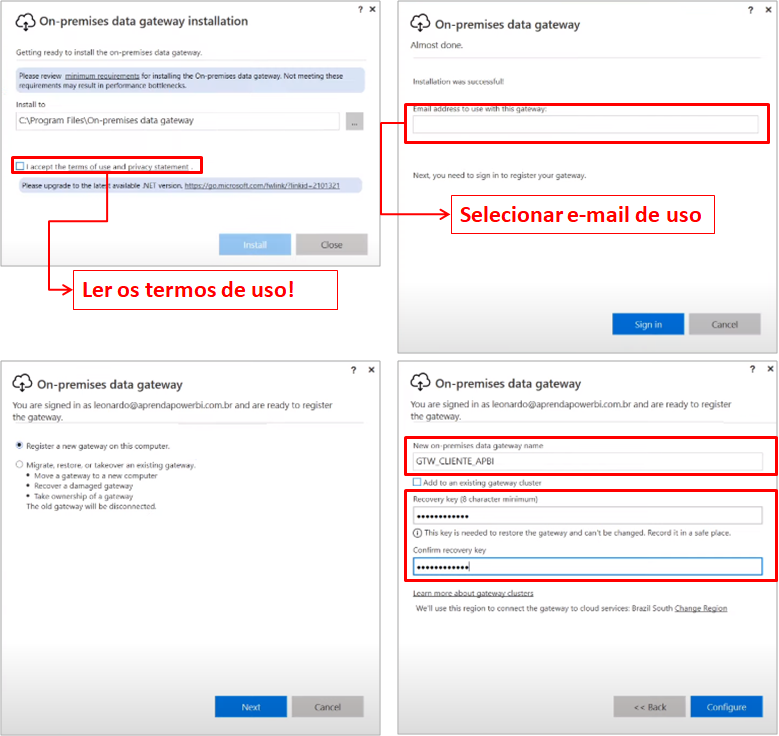
Image 35: Installing and setting a gateway
Steps:
Open the downloaded file → Select install location → Read "terms of use" and evaluate whether you will accept or not → Select usage email → Name gateway → Create recovery key
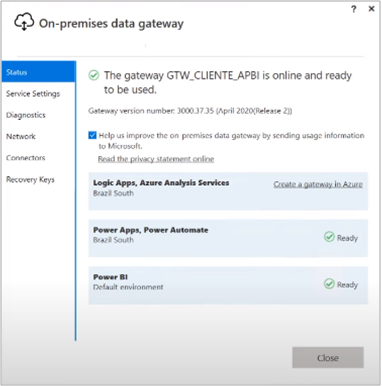
Image 36: Gateway ready to use
We can check if the gateway is in service in the task manager:
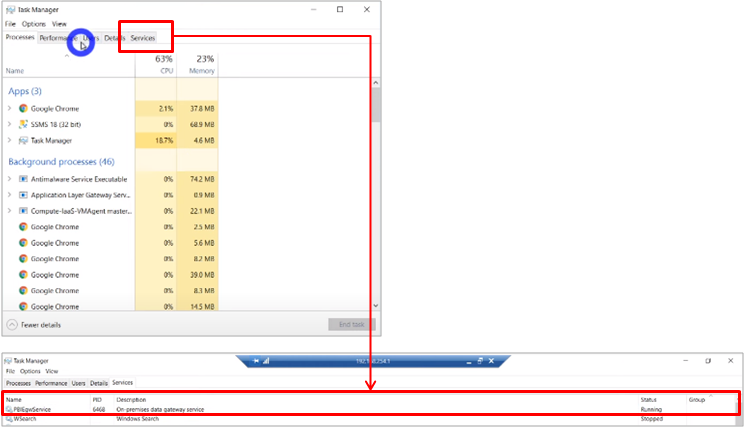
Image 37: Checking the gateway usage in Task Manager
Steps:
Open the task manager → Click on "Services"
| Important: It’s usually not the role of the BI consultant to perform a client’s gateway setting. This is the role of the client’s IT or someone hired by it! If you are aware of this matter is going to carry out the activity, describe it as a specific item in your contract. |
With the gateway installed and set in the client’s environment, let’s go to the Power BI Online environment to manage gateways:
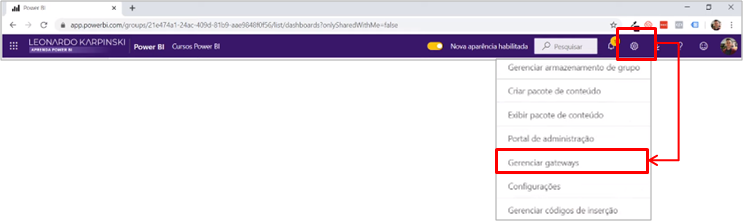
Image 38: Gateways managin in Power BI Online
Steps:
Open Power BI Online → Click on "Settings" → Select "Manage gateways"
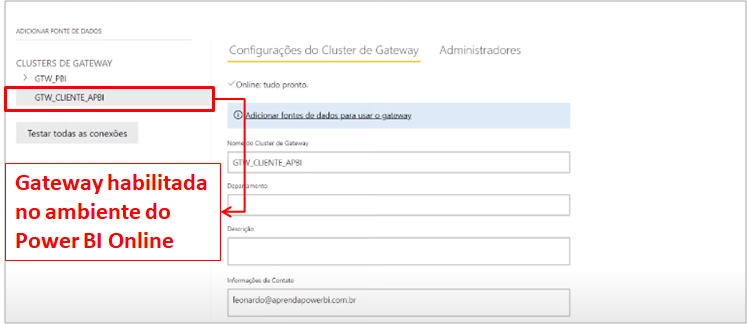
Image 39: Gateway enabled for use in Power BI Online
We have the gateway enabled! The next step is to change the data source parameters in the Power BI Online environment in order to use the production database (customer environment):
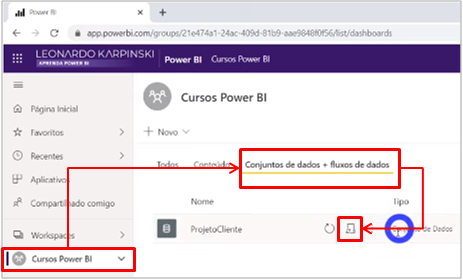
Image 40: Accessing the environment to change parameters
Steps:
Select the report workspace → Click on "Dataset + data flow" → Click on "Schedule refresh"
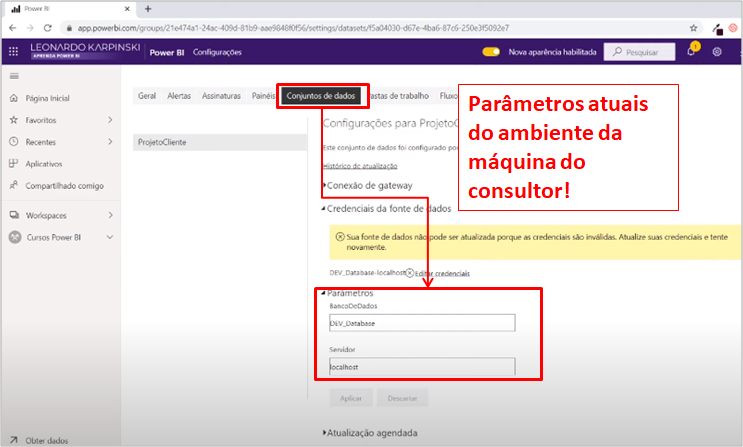
Image 41: Actual Parameters (Staging Database and localhost server)
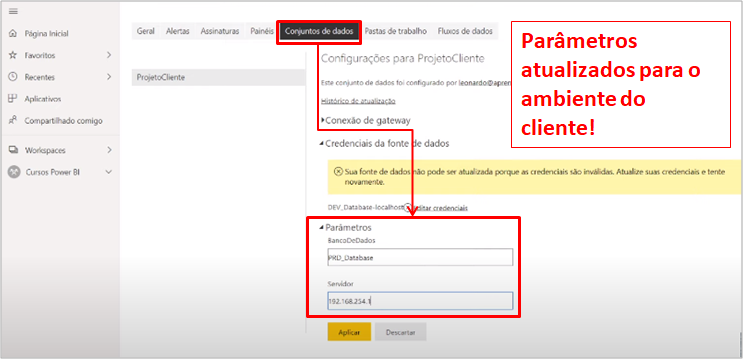
Image 42: Updated parameters (Production database and client server)
Steps:
Change the "BancoDeDados" and "Servidor" parameters
Parameters updated successfully! Now, we go back to the gateway setting in the Power BI Online environment:
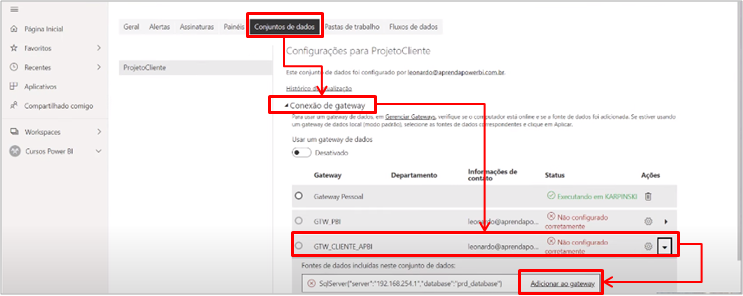
Image 43: Selecting connection to the created gateway
Steps:
In "Data set" and "Gateway connection" click on the arrow of the gateway created → Click on "Add gateway
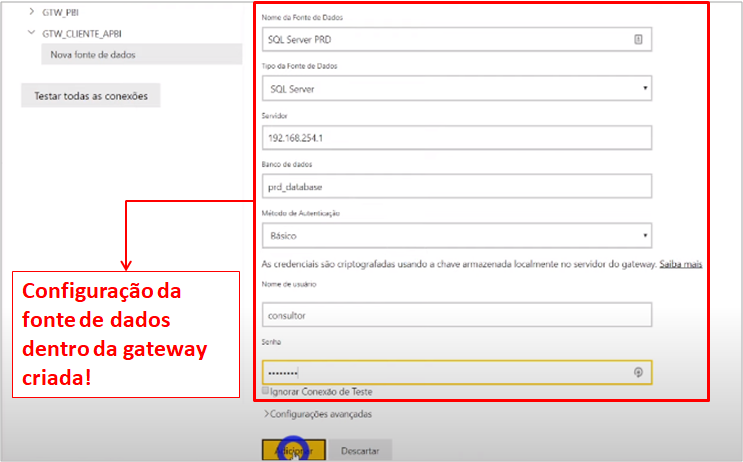
Image 44: Setting the Data Source
Steps:
Fill in the data source and server information
The last setting step is to map the gateway source within the dataset (we have to go back to the gateway connection area of the data set):
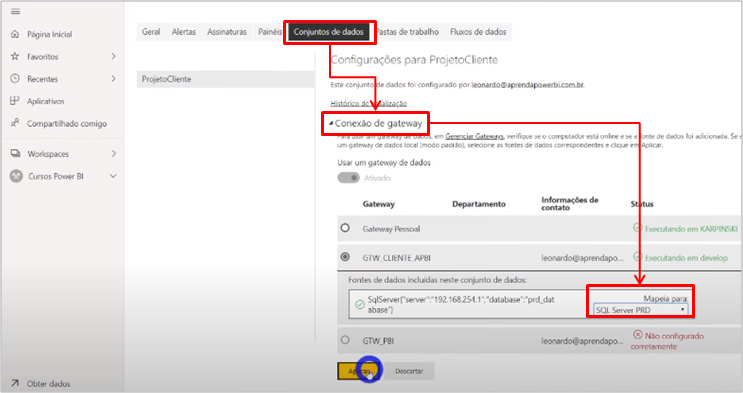
Image 45: Source mapping on gateway
Steps:
In "Data set" click on "Gateway connection" → In "Map to:" select the configured data source
Let’s open the report and see if it worked?
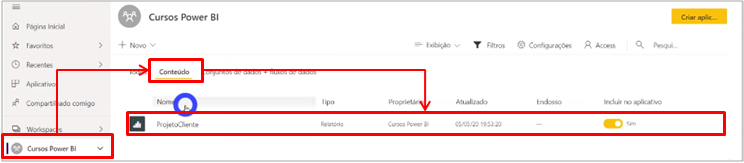
Image 46: Opening the report
Steps:
In the report workspace click on "Content" → Click on the report
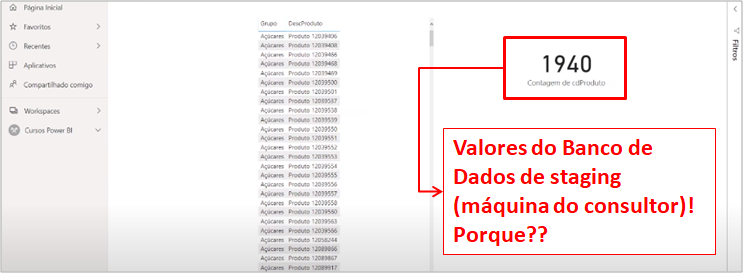
Image 47: Report with outdated data
As we can see, the data are from the staging environment (consultant’s machine). Can you guess why? If you remembered that the data set wasn’t refreshed, this is correct! Let’s do it then:
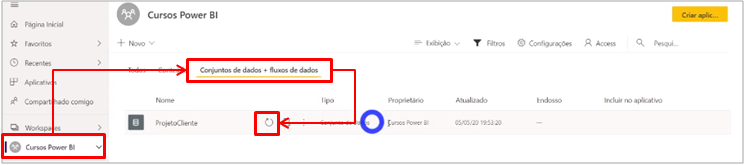
Image 48: Dataset refresh
Steps:
In the report workspace click on "Dataset + data flow" → Click on "Refresh now"
Opening the report again:

Image 49: Opening the Report
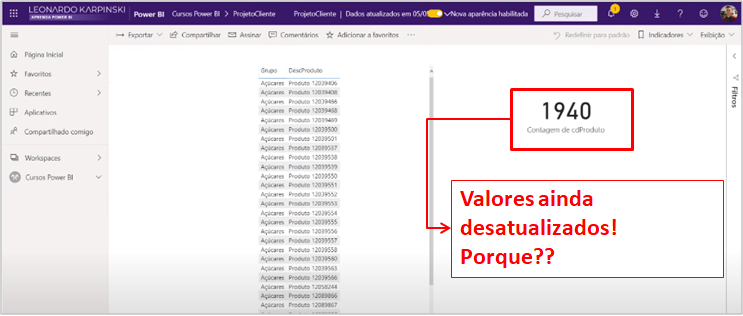
Image 50: Report with outdated data
Leo, did we do something wrong? All this work so that the setting doesn’t work? Calm down, no panicking when something seems wrong! It’s just a delay in the browser cache. As we refreshed the dataset content and instantly opened the report, the cache wasn’t updated. We can force the report refresh and verify the update:
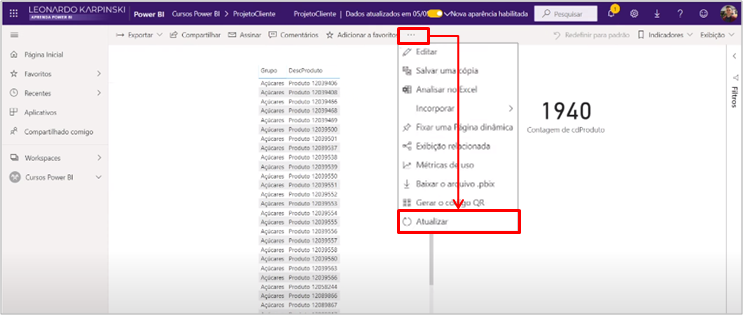
Image 51: Refreshing the Report
Steps:
Click on "More options" → Select "Refresh"
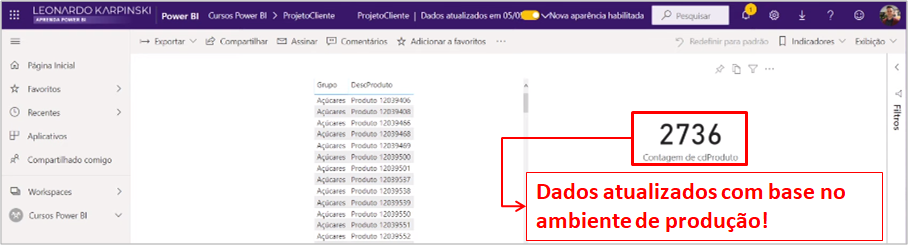
Image 52: Refreshed data
| Tip: If your client works with a “SAAS” system or data in the cloud, access will have to be done via APIs or manually extracted reports. |
In all cases, to import the client’s production database into Power BI Online, you need a gateway connection!
Using a Data Warehouse
This is a scenario of excellence! Development is done with access to the DW (Azure SQL Database).
Azure SQL Database is a very simple tool to use and allows periodic updating. It will serve as a data source for Power BI! The development flow is as follow:
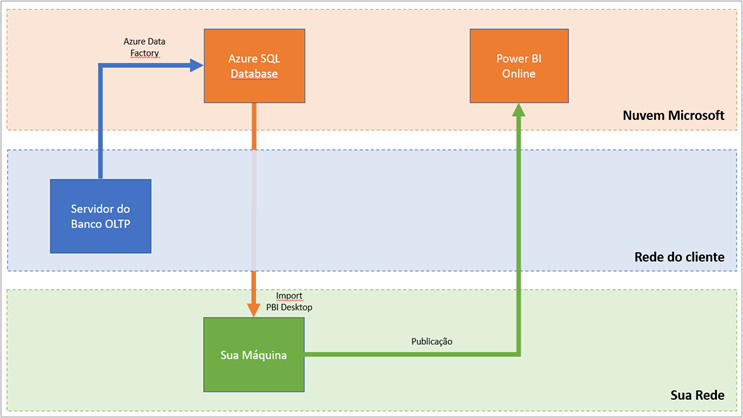
Image 53: Process Flow with DW (Azure SQL Database) usage
In this way we don’t need a gateway connection to refresh. We will need a tool to send the data from the source (OLTP database) to the DW (Azure SQL Database). This tool is the “Integration Runtime“. The updated looks like:
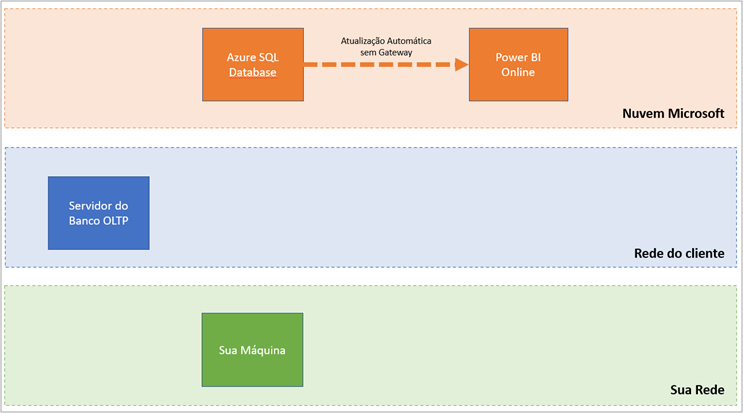
Image 54: Update flow in the cloud through new process
| Dica: For more details on the “Integration Runtime” visit the Microsoft link: https://docs.microsoft.com/en-us/azure/data-factory/concepts-integration-runtime |
Let’s connect to Azure to show the virtual machine we remotely accessed for the first development and also see the Azure SQL Database options:
Image 55: Connecting to Azure

Image 56: Azure environment with product list
Image 57: Client environment
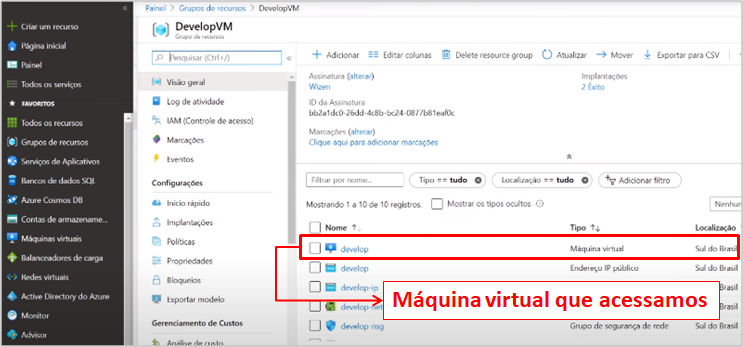
Image 58: Virtual Machine
Steps:
Select "Resource Groups" → Click on the machine environment → Select the virtual machine
Below we can see the the virtual machine setting:
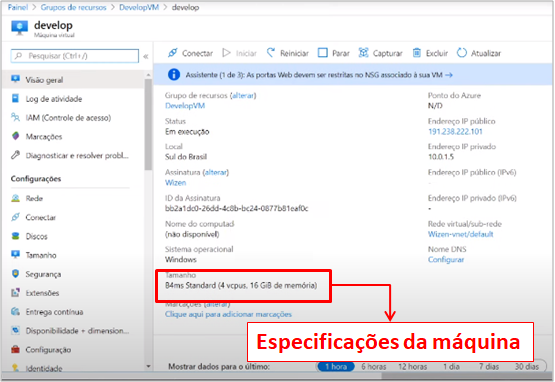
Image 59: Virtual machine specifications
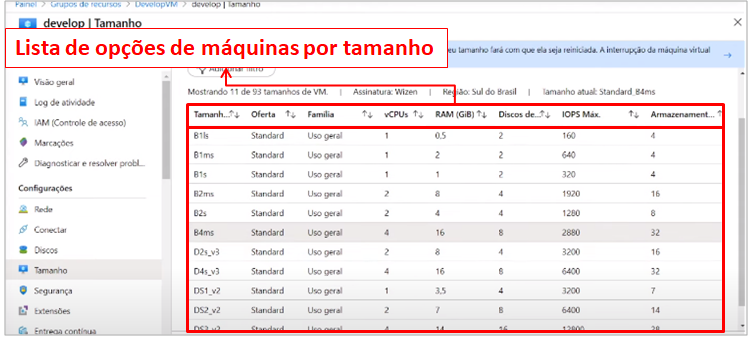
Image 60: Some virtual machine options
Steps:
Click in "Tamanho"
Let’s enter the query environment to create the Data Warehouse:
Image 61: Environment for the Azure SQL Database creation
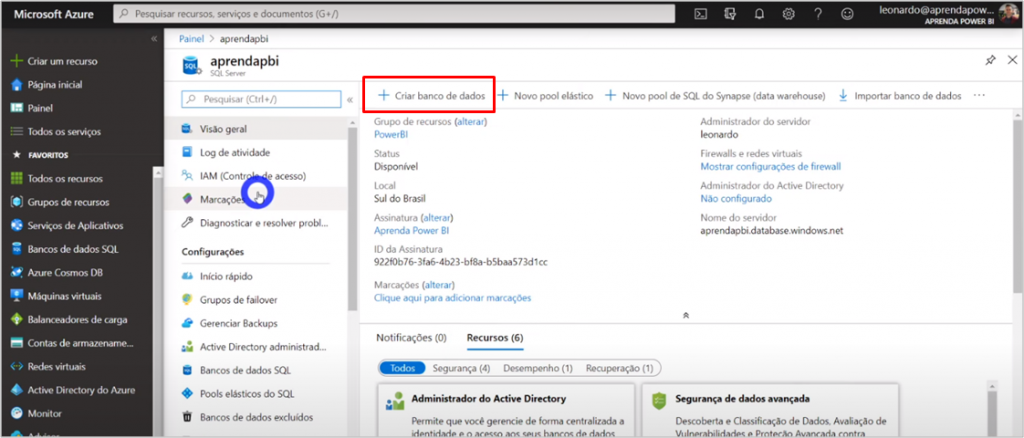
Image 62: Environment for the Azure SQL Database creation 2

Image 63: Details and Settings selection
Steps:
Select "All Resources" → Select a SQL Server resource → Click "Create database" → Click "Database Settings"
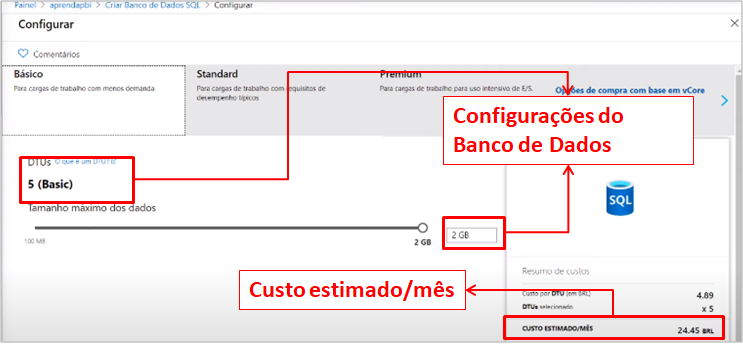
Image 64: Database settings (2GB) and cost/month estimate (“custo estimado mês”)
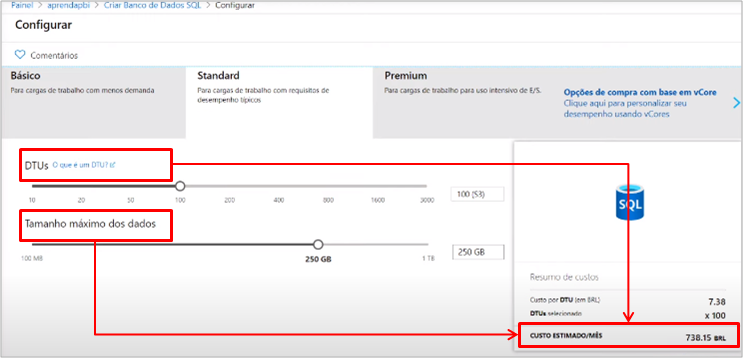
Image 65: Parameters that affect the cost/month
When in a project involving a cloud database, negotiate whether the Azure account used for the Data Warehouse will be yours or the client’s. This must be negotiated and signed in a contract, because if it is in your account (the consultant) the price of the project must include the monthly service fee!
Questions and answers
Well, at the end of Live # 16 we had our questions and answers! Below is the list of what we talked about:
“Leo, if an application already has the production and development database on different servers, then I can assume that the development database itself would be a staging, right?” – Thiago Esmerine
Yes, you can!
“Good evening, Leonardo! What is the biggest challenge as a consultant?” – Edson
Mapping the project requirements! If this isn’t well done your project may be a failure and have a negative financial impact.
“Does Azure have the possibility to create a free database? Or just paid? Only the account is free?” – Sergio Oliver
Only the account is free! You have the option to create a subscription and place your card associated with it, then you earn around R$700.00 for “testing”.
“How to do a good requirements mapping?” – Rafael Martins
Interviews! Focus on the right questions ….. talk to the client’s end users and IT.
“Do you use any confidentiality terms for client’s data? If so, can you show an example?” – Lucas Harmatiuk
Yes! Usually it’s the client who provides ….. but you can find models on the Internet.
Well guys, that was the content of our Live # 16 !! If you have any questions or suggestions for the next Live topic, leave it in the comments.
See you, guys.
Leonardo!