Hey guys!! How are you doing??
Today’s topic is about how to get and automatically refresh data from APIs (a subject I’m always asked about), which I talked about on Live # 22! It’s a more dense and technical subject, as it involves a little programming! However, not so difficult that you can’t develop. I assure you this is worth reading since there aren’t many contents that explain it in a practical way.
Straight question: “What is API?”. If you don’t know, follow along and you will understand a lot about the subject!
In this post I’ll explain:
– What is an API
– Demonstration cases (Trello, WheatherAPI, CRM Pipe Run): ways of authentication and how to test
– Tips for study material
What is an API?
To help explain what an API is, I’m going to use our good old Google:
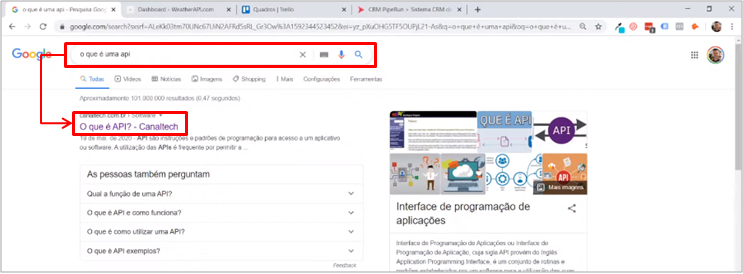
Image 1: Search on the browser
In short: it is when we have a software (software company) and we have a system with a database within it. You want your user to have access to that database. In order not to create a user for each of your clients and have all the work of technical knowledge, permissions (for example firewall). The solution is to provide the client with an interface in which a database may be reached programmatically (there is programming behind it).
| Tip: In this example link I have the most complete description of what API is: https://canaltech.com.br/software/o-que-e-api/ |
Trello
An example is Trello. Trello is a website where you can assemble flows (projects, tasks, etc.) through cards, it looks like a Kanban. For those who don’t know, I will show an example:

Image 2: Trello website

Image 3: Task cards
We are able to access the information on these cards through the Trello API (programming). Trello’s developers created this interface in order to make information available to their users.
Is this clear? Did you understand the main idea of the API?
Now, imagine if anyone could access data through that interface. It wouldn’t be cool, right? Customers would be unlikely to continue using this solution. That’s why there’s authentication! Which means, the data is private.
To reach this data we have the following ways:
– API Key in the URL
– Token
– Username and password
In this article, I will show you 2 of these ways.
It’s important to mention that to work with and learn about APIs you will have to be persistent and curious! That’s the only way to develop on this subject. I say this because it’s unlikely there’ll be someone on the company’s side who’ve created the solution and is able to teach you.
Back to our Trello example, let’s look for Trello API documentation in the browser:

Image 4: Broswer search
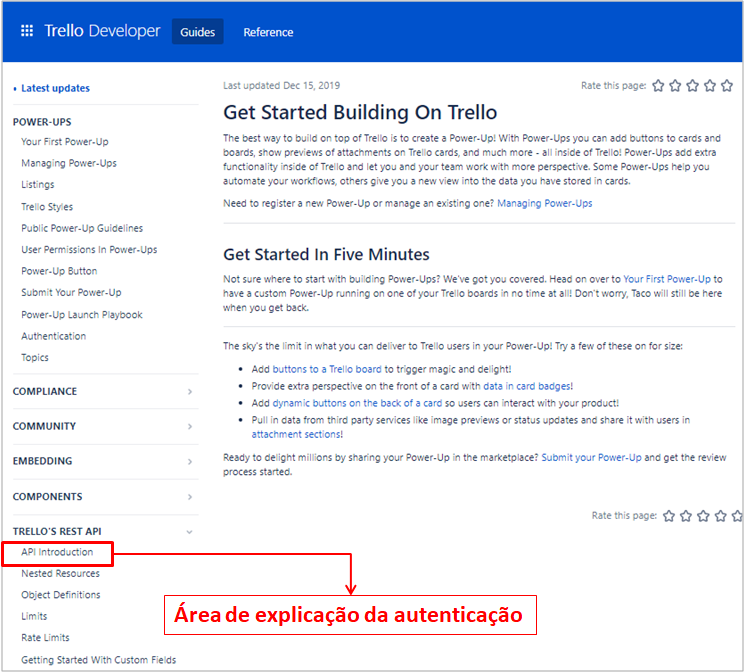
Image 5: API explanation environment
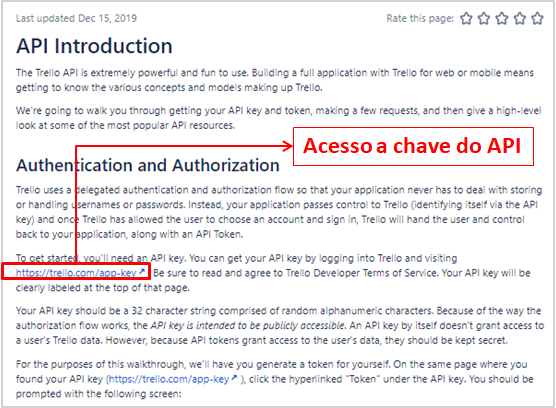
Image 6: Access to the API key area
For this case, I’m working on a test account. I’ll discard this key as soon as we finish the explanation. However, it is very important that you don’t pass on your API key, as it’s an authentication item that can be used for improper access!
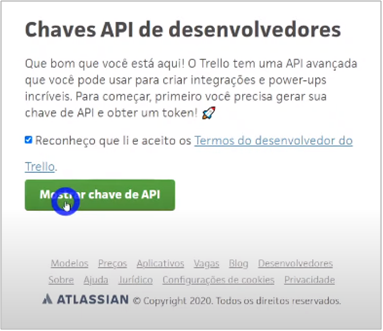
Image 7: Requesting the API key
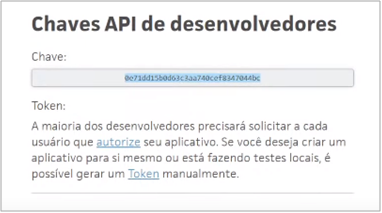
Image 8: API key
Well, we have the key! One more item is missing: the Token. For the token, just click on the icon in the same window:
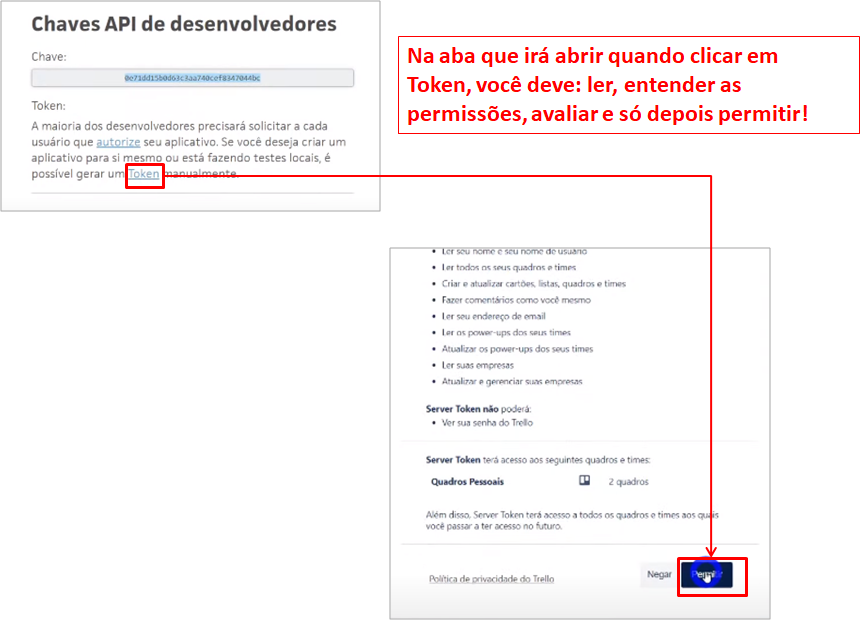
Image 9: Enabling permission through Token
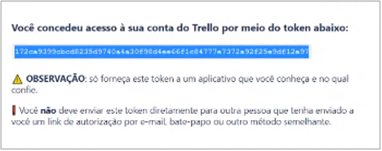
Image 10: Token
Generally, in good documentation, you can test calls in the documentation itself! I will show in a later example.
For the Trello example, we have 3 main calls (resources):
– Boards
– Lists
– Cards
To make the boards all, we’ll use the following general URL:
Call:
https://api.trello.com/1/members/me/boards?key={yourKey}&token={yourToken}
Note the terms “yourKey” and “yourToken“. This is the information that we must exchange for the information we just obtained. So, our call is:
Call:
https://api.trello.com/1/members/me/boards?key=0e71dd15b0d63c3aa740cef8347044bc&token=172ca9399cbcd8235d9740a4a30f98d4ee66f1c84777e7372a92f25e9df12a97
With the call copied, we go to the browser and paste it to be able to access the information:
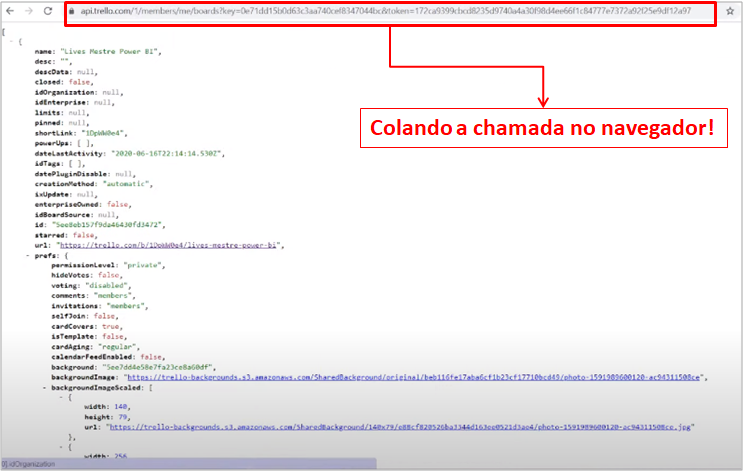
Image 11: Call result in the browser
The callback is a JSON with all the properties of the boards/lists/cards. Do you remember the pictures on the home screen of my environment on the Trello website? There were two cards there, I will show a part of the code of each one with the card next to it:
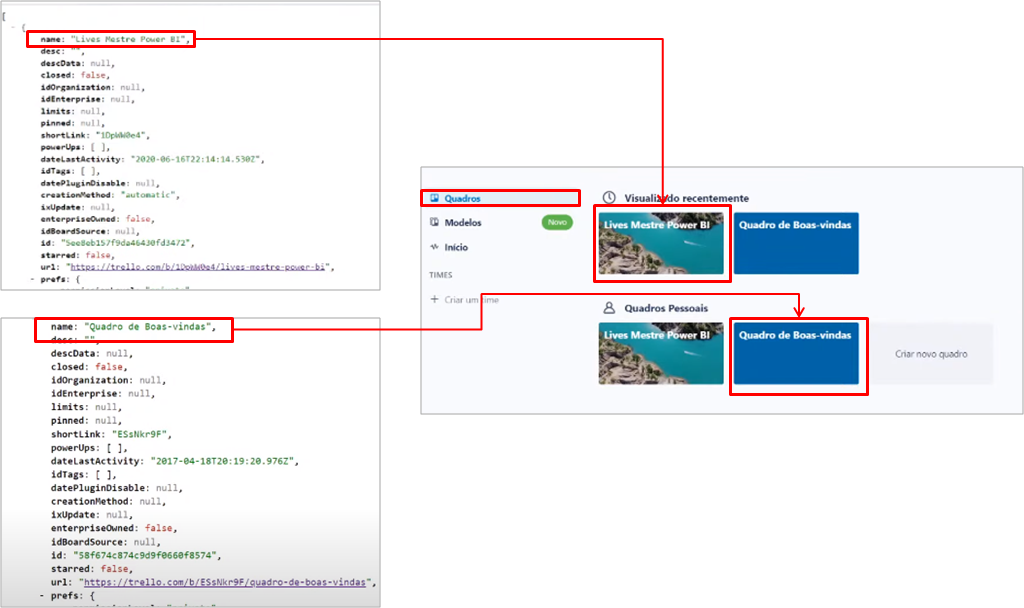
Image 12: Code and cards visual
Well, is it always possible to make a call using the browser? No! This way worked because the authentication is in the URL itself. There are other ways, which you can’t get via the browser and you’ll have to use Postman (calm down, I’ll show you later).
With this first contact, we can move on to Power BI. I want to explain that I don’t consider making the call directly through Power BI the best solution (just as it is not the best option to connect Power BI directly to your transactional database). It’s more efficient to have a staging layer and a Data Warehouse for development. This reduces risks and makes the call more performative!
In Power BI, go to “Get data“:
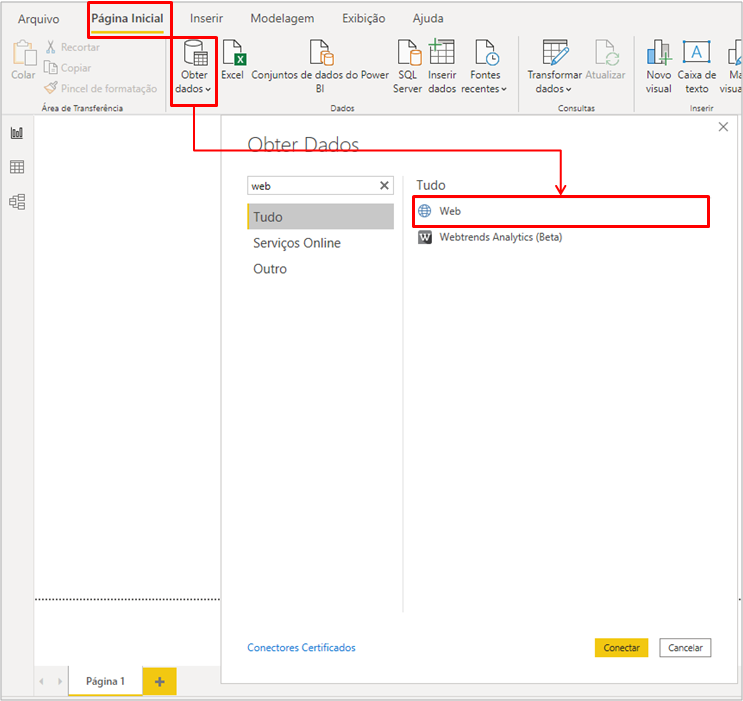
Image 13: Getting data from Web

Image 14: Informing the call URL
Steps:
Open a new file in Power BI Desktop → In "Home" click on "Get data" → Select "Web" → In the new box paste the URL for the boards call
With that done, the Power Query environment will open with the code in list form for each card:

Image 15: Codes in list form
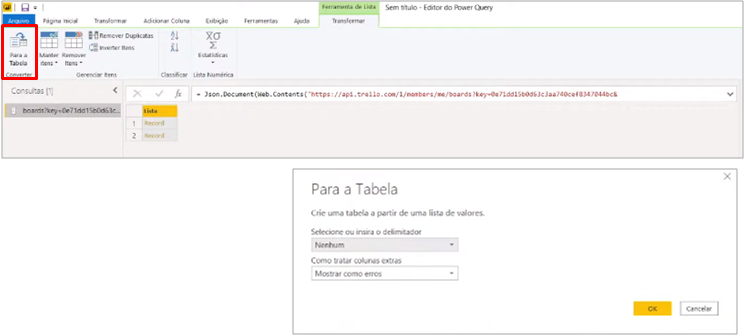
Image 16: Transforming the lists into tables
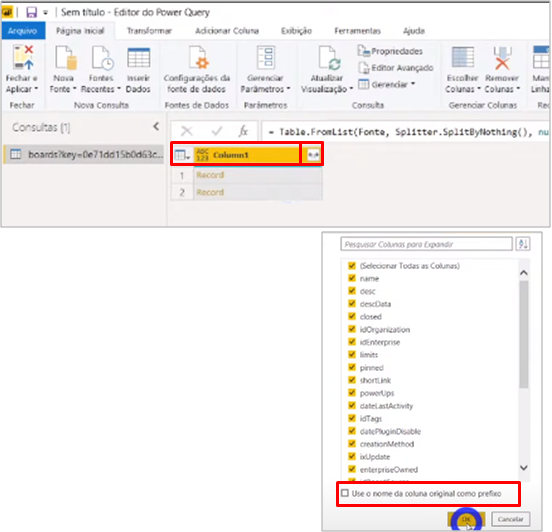
Image 17: Expanding the Table

Image 18: Expanded Tables and changed name
Steps:
1. In "Transform" click on "To Table"
2. Click the expansion arrow next to the column name → Disable "Use the original column name as a prefix"
3. Change the query name
Ready! We have the information from the boards. To use dynamic references in the process and be able to use the information more than once, we will create 3 parameters:
– Token
– API key
– idBoard

Image 19: Creating Parameters
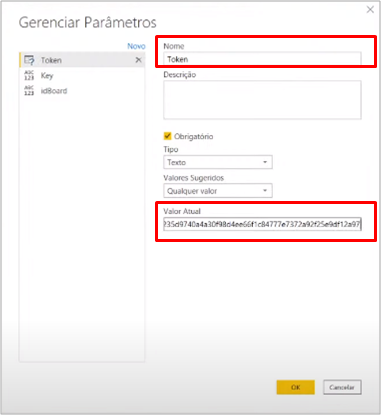
Image 20: Token Parameter
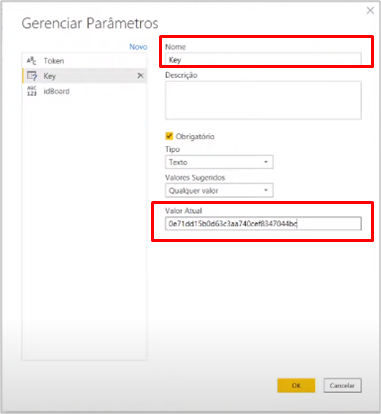
Image 21: Key Parameter
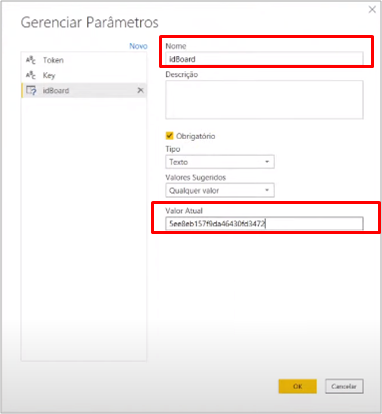
Image 22: idBoard Parameter
Steps:
1. In "Home" click on "Manage Parameters"
2. Change "Name" to "Token" and "Current Value" to our Token value → Click "New"
3. Change "Name" to "Key" and "Current Value" to our Key value → Click "New"
4. Change "Name" to "idBoard" and "Current Value" to paste the value of the first id
To optimize the boards call, I will use 2 devices within the “source” to reference the URL to the Token and Key parameters:

Image 23: Accessing the “Source”
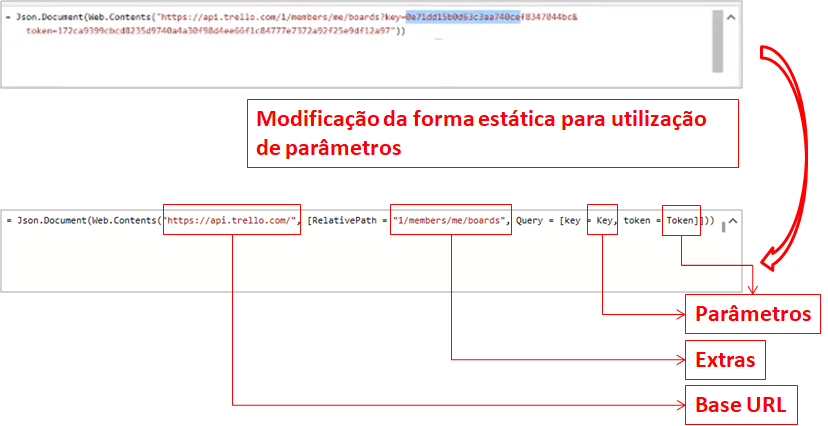
Image 24: Modifying the Source
Steps:
1. In "Boards" click on "Source" within the "Applied steps" field
2. Change the formula
Formula:
= Json.Document(Web.Contents("https://api.trello.com/", [RelativePath = "1/members/me/boards", Query = [key = Key, token = Token]]))
This step is very important because only through it you will be able to make it work in Power BI Online. Even if it’s working in Power BI Desktop when we publish it would be a problem in Power BI Online.
Now, for Lists we will take advantage of the query made for Boards and duplicate it:
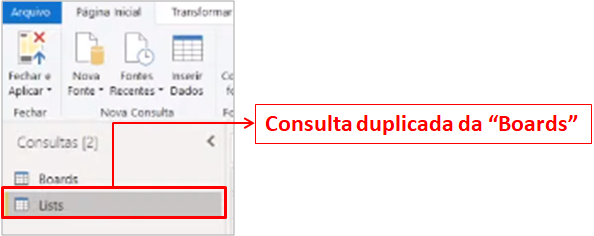
Image 25: Lists query created
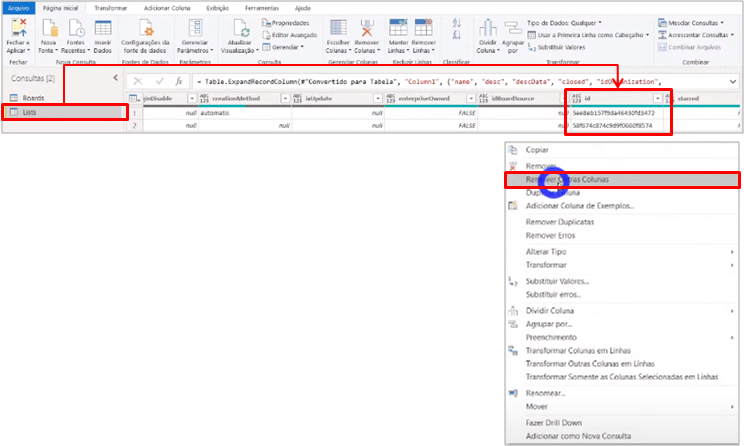
Image 26: Removing other queries
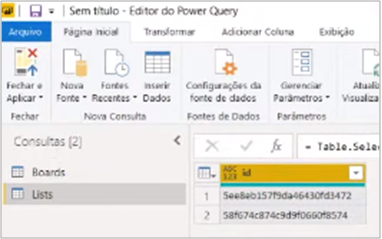
Image 27: Lists result
So far, we only have the primary information (idBoards) to invoke the other Lists columns. We will invoke with the help of a function: GetLists! I will provide the ready function and copy it to our file:

Image 28: Function copied to the file
GetLists function:
= (idBoard as text) => let
Fonte = Json.Document(Web.Contents("https://api.trello.com", [RelativePath = "/1/boards/" & idBoard & "/lists", Query = [key = Key, token = Token]]))
in
Fonte
This formula calls lists from a specific Board (so we need the id). Now in the Lists query, let’s add the new columns:
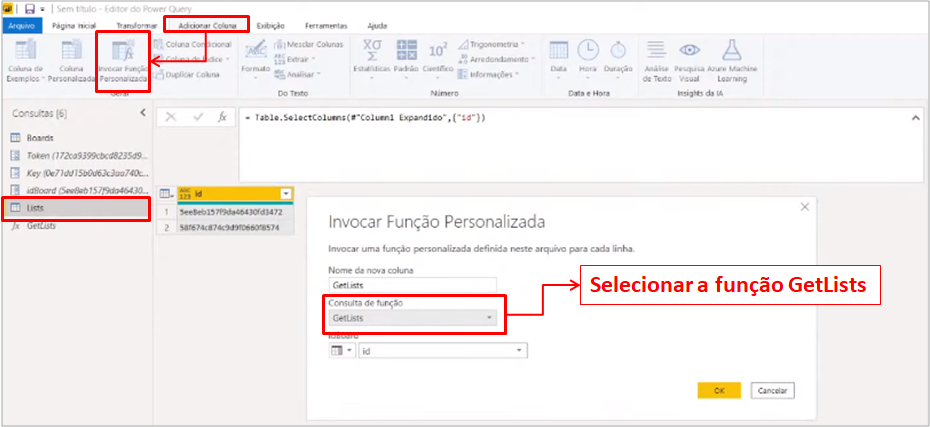
Image 29: Copied function
Steps:
In "Add Column" click on "Invoke Custom Function" → Select "GetLists" in "Function Query"
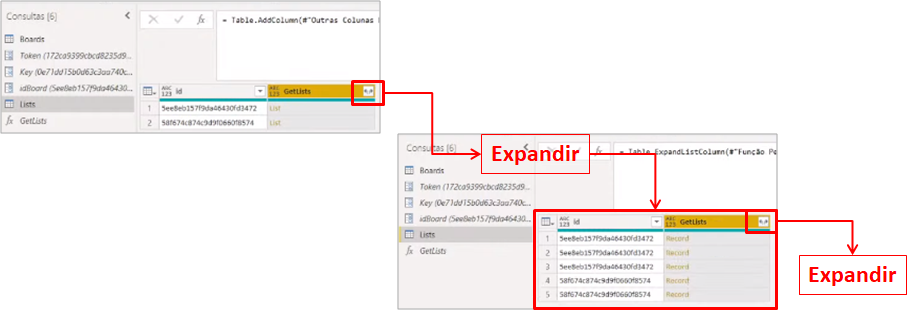
Image 30: Expanding the table with the added columns
Steps:
Click the expansion arrow in the corner of the "GetLists" column → Click the expansion arrow in the corner of the "GetLists" column
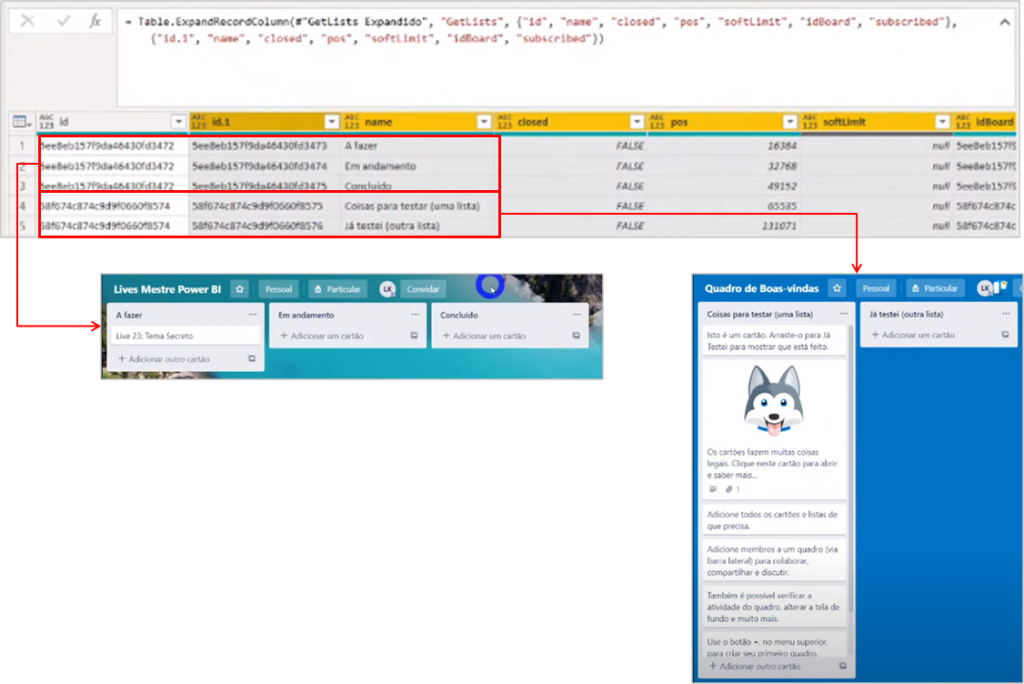
Image 31: Expanded Table and List reference in the Trello website
Note that in the formula row we have which columns are present in the table. And in the image, for each card we have (id) the lists present on them.
Continuing, we will create the Cards query. The process is the same as we did to create the Lists query (duplicate boards, leave only the id column, and invoke the other columns through a function):
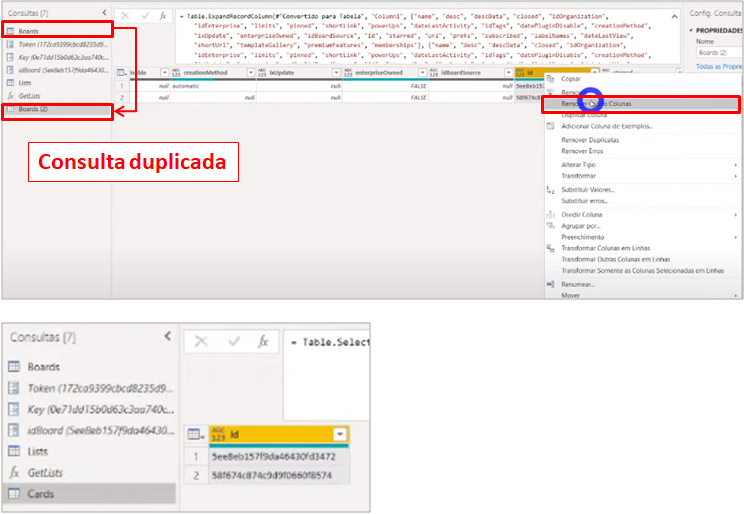
Image 32: Creating Cards query
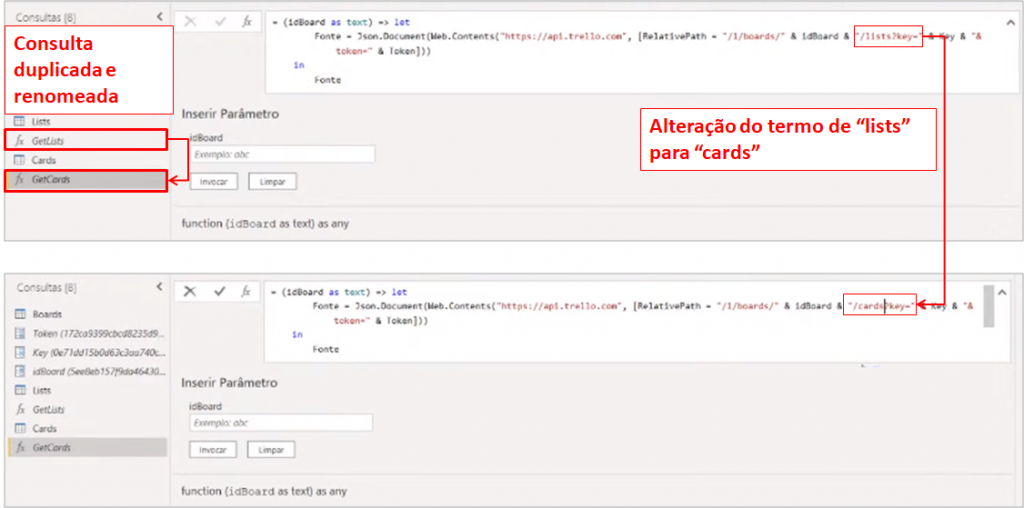
Image 33: Creating GetCards function
Steps:
1. Duplicate the Boards query → Select column "id" → Right-click → Select "Remove other columns" → Rename query to Cards
2. Duplicate GetLists function → Rename to GetCards → Change the term
GetCards Formula:
= (idBoard as text) => let
Fonte = Json.Document(Web.Contents("https://api.trello.com", [RelativePath = "/1/boards/" & idBoard & "/cards", Query = [key = Key, token = Token]]))
in
Fonte
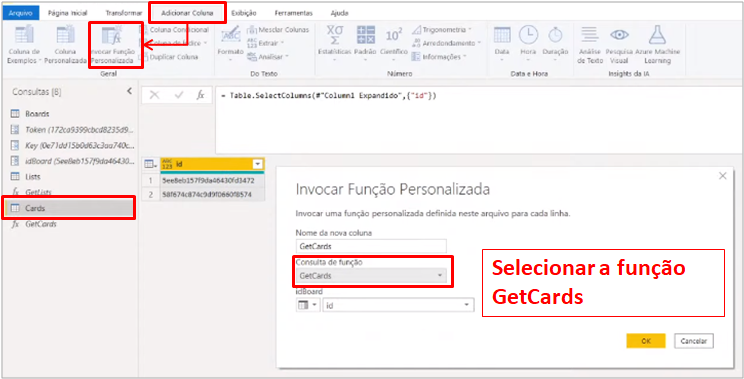
Image 34: Invoking columns through the function
Steps:
In "Add Column" click on "Invoke Custom Function" → Select in "Function Query" the "GetCards"
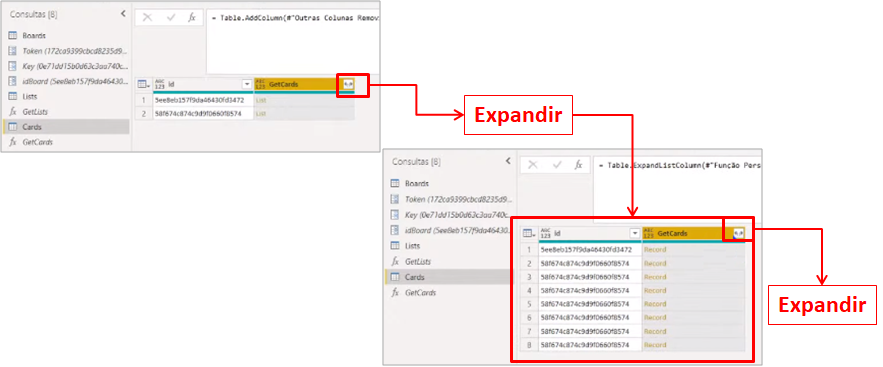
Image 35: Expanding the table
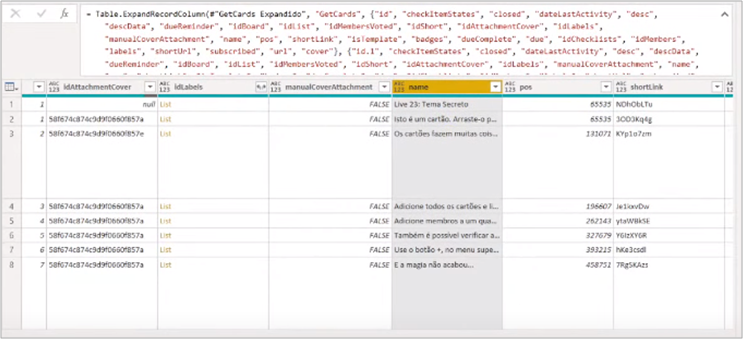
Image 36: Expanded table
All set! Expanded table … cool, right? But, does it work? I’ll change a card there on the website and see if by refreshing our Power Query the values change:
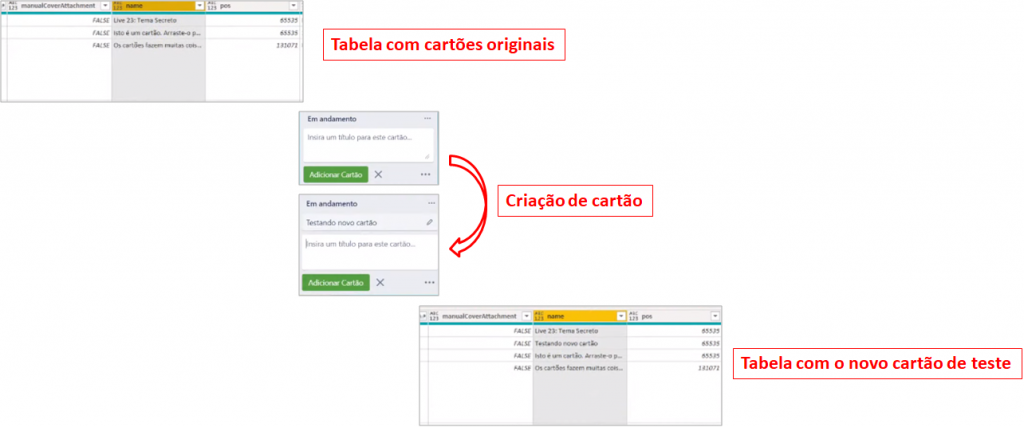
Image 37: Refreshing test in website
Steps:
Evaluate the "Name" column and its cards → Add the "Testing new card" card on the Trello website → Refresh Power Query → Evaluate the "Name" column with the new present card
There you go! With the test done, I can move on. I will close and apply and go to the Power BI environment.

Image 38: Close and Apply
The first step in Power BI is to create the relationships. Our hierarchy will be:
Cards → Lists → Boards
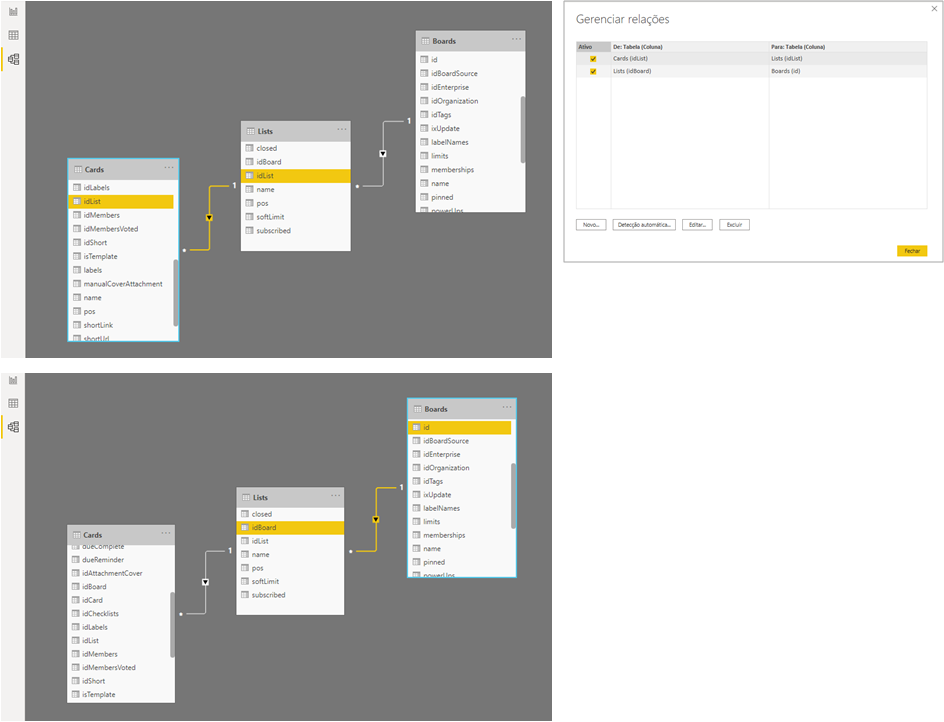
Image 39: Model Relationships
Are the relationships working? To test, let’s create a table:
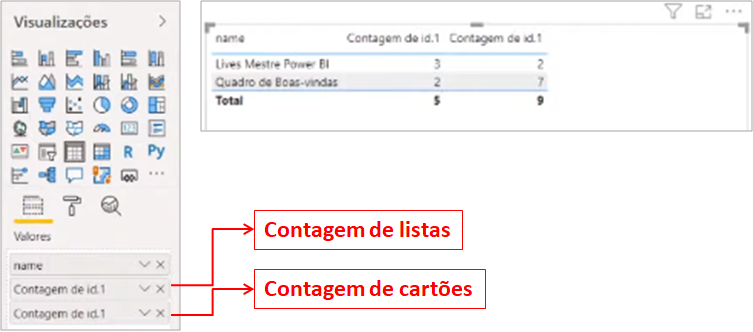
Image 40: Table visual
Steps:
In "Views" select "Table" → Drag the fields "name", "id.1" from Lists and "id.1" from Cards to values
It worked! The contexts are working according to the created relationships. Now, I will do one more test and create a new list and a new card for the “Live Mestre Power BI” Board:
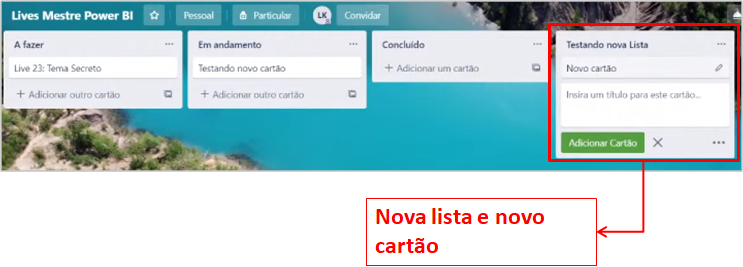
Image 41: List and card creation
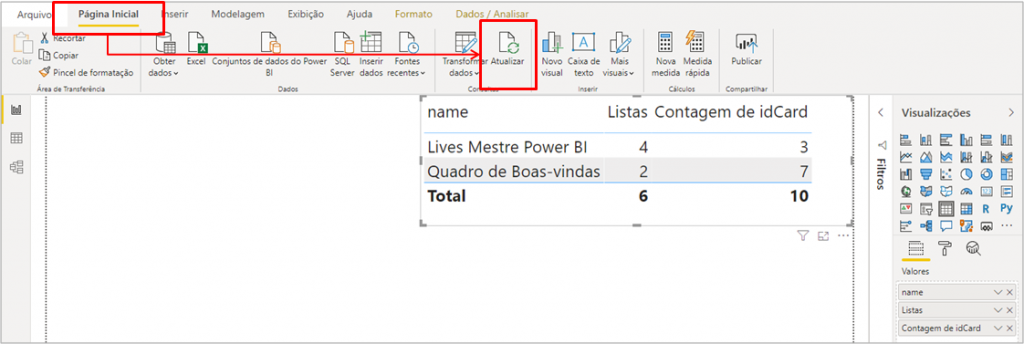
Image 42: Power BI refresh
Steps:
Creation of new list and new card in Trello → Rename ids in "Values" → In "Home" click on "Update"
Again, it worked! In the image, see that we have an additional list and a card for “Lives Mestre Power BI”. We finished development on Power BI Desktop, now just save the file and publish:
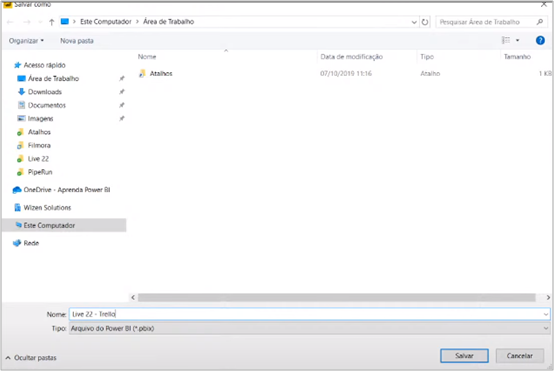
Image 43: Saving the file
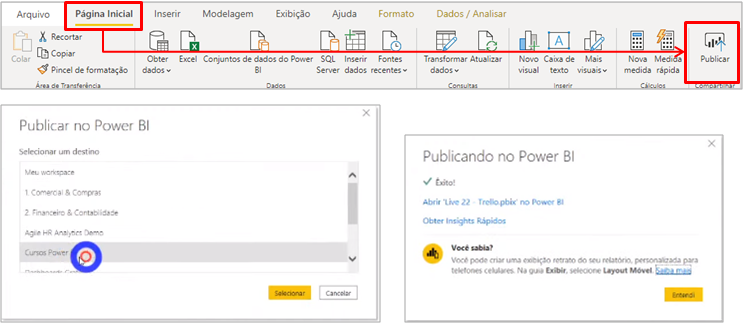
Image 44: Publishing the file
Steps:
1. Click on "Save" → Choose project location and name
2. In "Home" click on "Publish" → Choose the workspace for publication
A lot of people have a problem with APIs in the Power BI Online environment in terms of the credentials of the data source. This may be due to not using Relative Path and Query. Let’s test and see if we have problems?

Image 45: Opening the credentials environment

Image 46: Entering credentials into the source
Since there is no error after “Enter”, the update is working!
You may be wondering why it works with Relative Path. This happens, because credential authentication in Power BI Online needs to be dynamic (we have more than one board, right?) And if we don’t use Relative Path we don’t have that dynamism. The Base URL is static.
Weather API
WheaterAPI is a free website where we can obtain weather information.
| Tip: For more information about the Weather API, visit the link: https://www.weatherapi.com/about.aspx |
I’m going to open my user home page in the browser, and let’s explore the information:
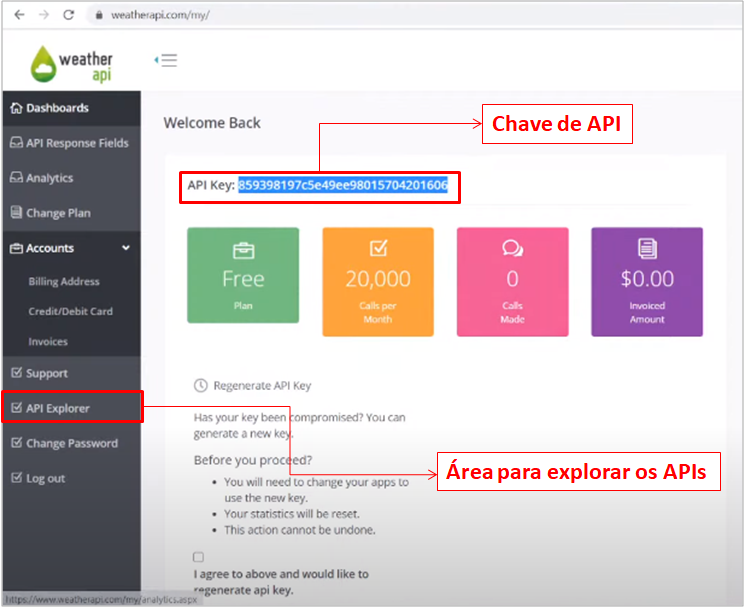
Image 47: Account home page
So, does it look familiar? Very similar to the information we get at Trello, right? Let’s enter the explorer and make a call with the API key and the city of Florianópolis:
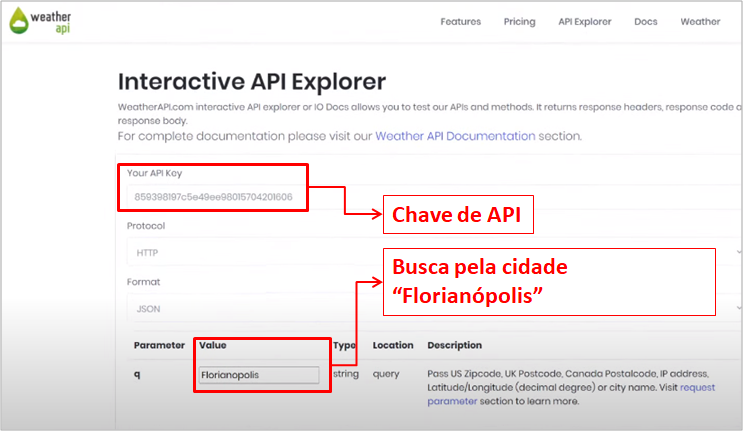
Image 48: API Explorer
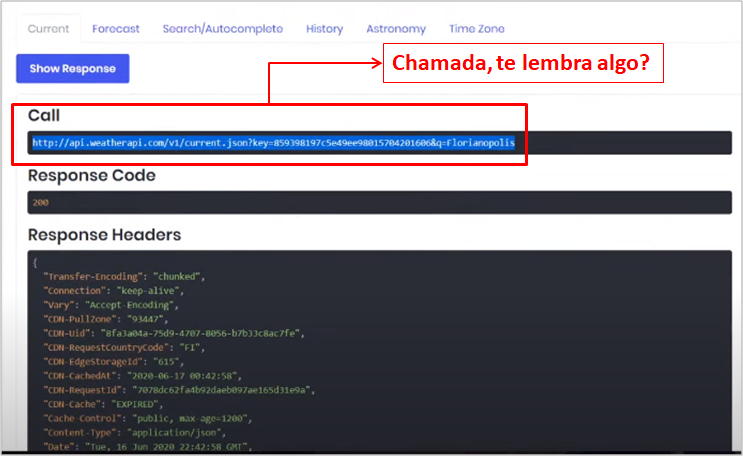
Image 49: Explorer
We can test the call in the browser, just as we did for Trello:
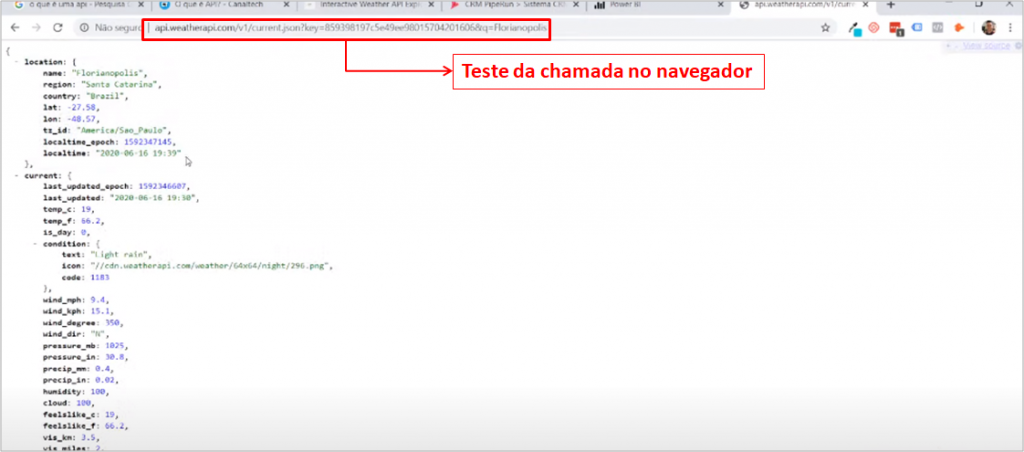
Image 50: Test on the browser
Call:
https://api.weatherapi.com/v1/current.json?key=859398197c5e49ee98015704201606&q=Florianopolis
In Power BI, we will obtain the data through the call:
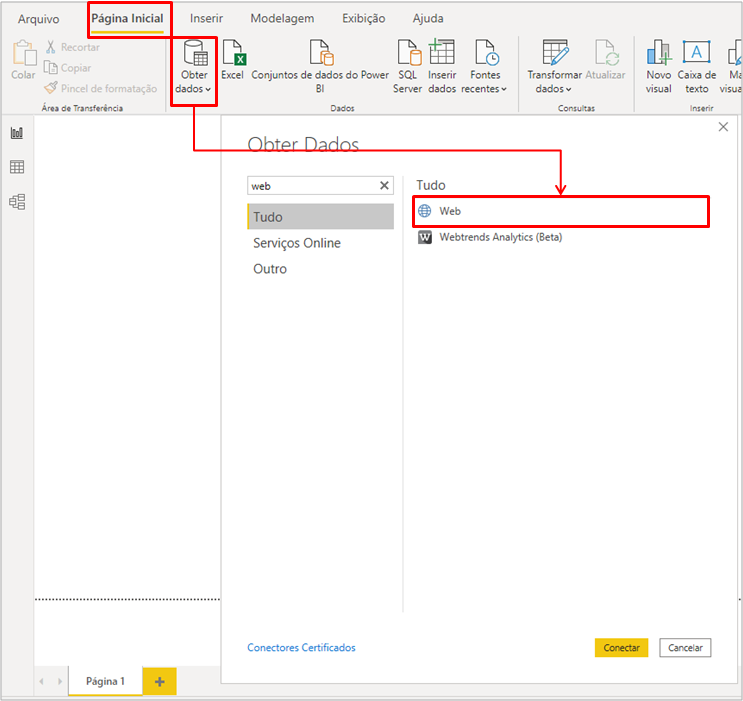
Image 51: Getting data with the API key

Image 52: Informing the API key
Then, in the Power Query environment, we transform the query:
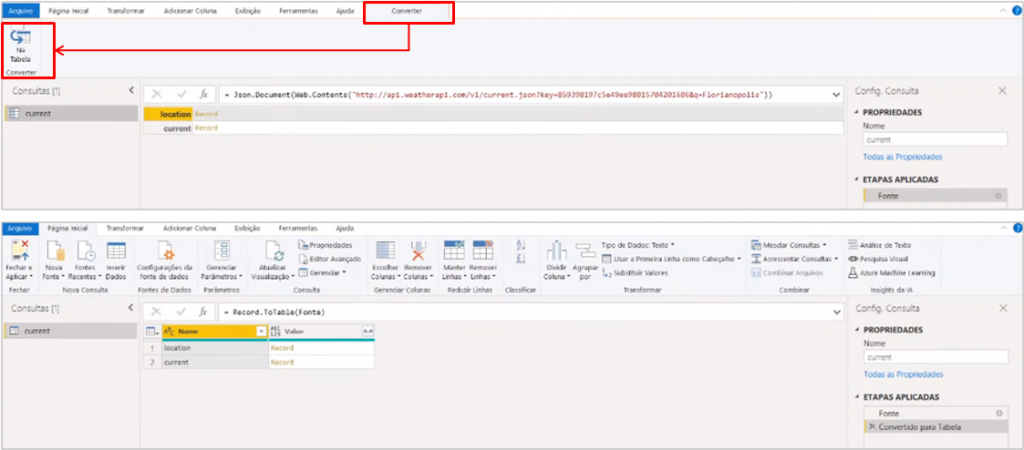
Image 53: Transforming the query
Steps:
1. Open a new file in Power BI Desktop → In "Home" click on "Get data" → Select "Web" → In the new box paste the URL call
2. In "Convert" → click "In Table"
For this example we will use 2 parameters:
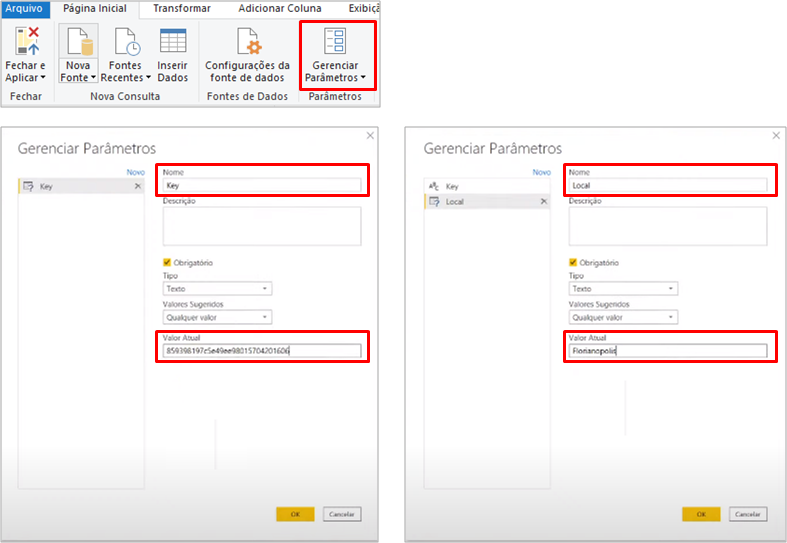
Image 54: Creating the parameters Key and Local
Steps:
1. In "Home" click on "Manage Parameters"
2. Change "Nome" to "Key" and "Valor Atual" to our key value → Click on "Novo"
3. Change "Nome" to "Local" and "Valor Atual" to Florianopolis
With the parameters created we can modify our query source, which is static:

Image 55: Changeing the static source
Steps:
Change the query source formula
Formula:
= Json.Document(Web.Contents("https://api.weatherapi.com/v1/current.json?key=" & Key & "&q" & Local))
We’ll transform this query into a function with the help of Power Query:
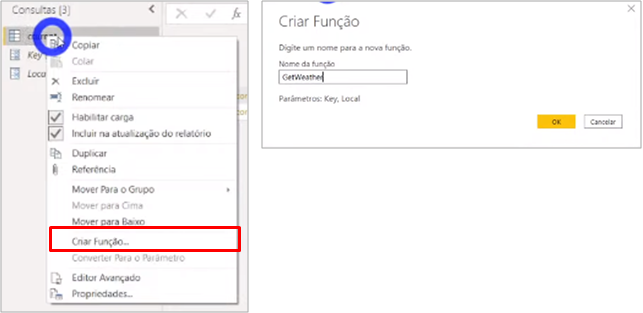
Image 56: Creating function from query
Steps:
Right-click on the query → Click on "Criar função..." (create function) → Name the function
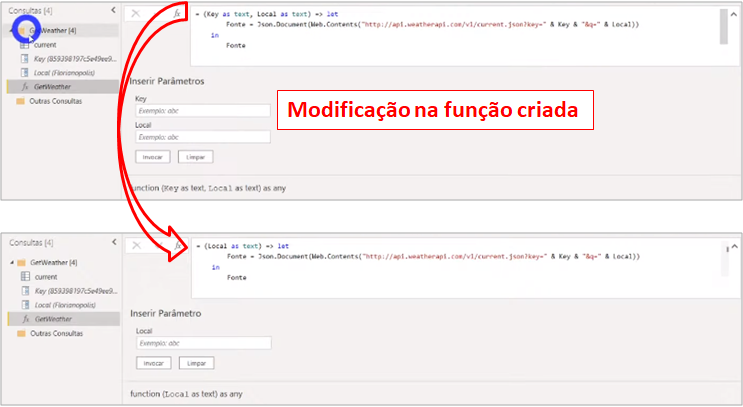
Image 57: Modifying the function
Steps:
Change the function formula
Formula:
= (Local as text) => let letJson.Document(Web.Contents("https://api.weatherapi.com/v1/current.json?key=" & Key & "&q" & Local)) in Fonte
Everything ok so far? If yes, great, if not …. persistence! Go back in the text, read again until you understand. We are not normally familiar with this subject, so dedication is required to learn.
We have the function! Shall we test it? For this, I will create a city list and pull the information for each one:
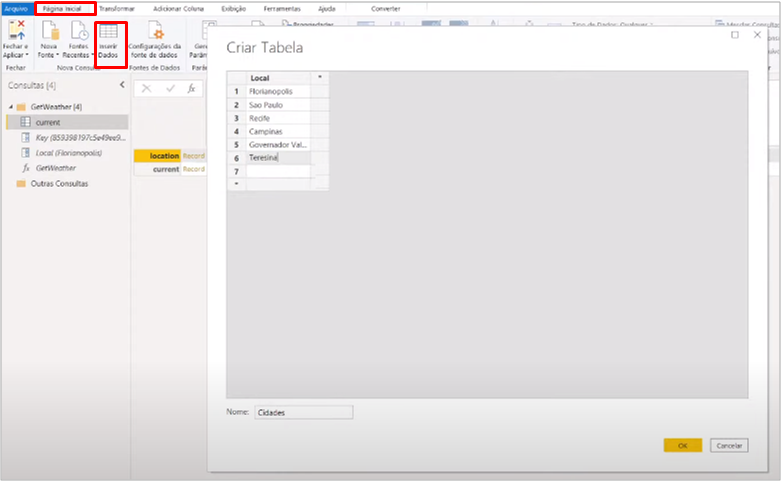
Image 58: Creating the table “Cidades” (Cities)
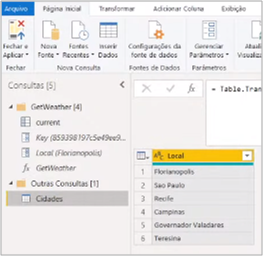
Image 59: Created table
Steps:
In "Home" click on "Insert Data" → Name the table and column → Insert information
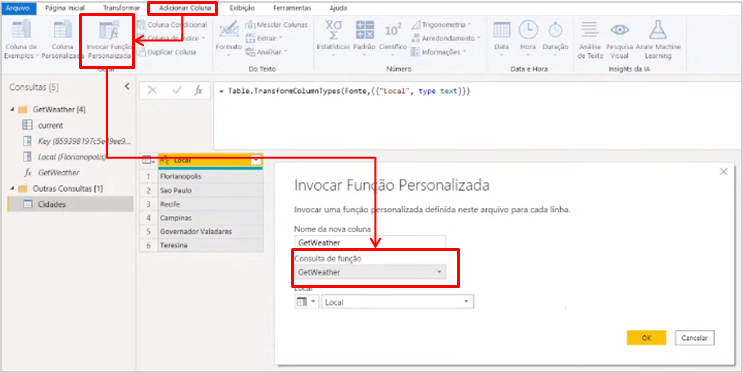
Image 60: Invoking the function

Image 61: Expanding the columns

Image 62: Expanded query and deleted queries
Steps:
1. In "Add Column" click on "Invoke Custom Function" → Select the function GetWeather
2. In the right corner of the "GetWeather" column click expand → In the corner of the "current" column click expand
3. Delet the queries "current" and "Local (Florianopolis)
All set, right? Is it? Go back to the GetWeather function and compare it to the functions we used in the Trello example.
So, did you find any difference? There is a difference, right? We didn’t use Relative Path! And I talked a lot about its importance … I did it on purpose to see what happens in Power BI Online if we don’t use that argument.
Let’s save the file and look at the data source settings (an error sign will be displayed):
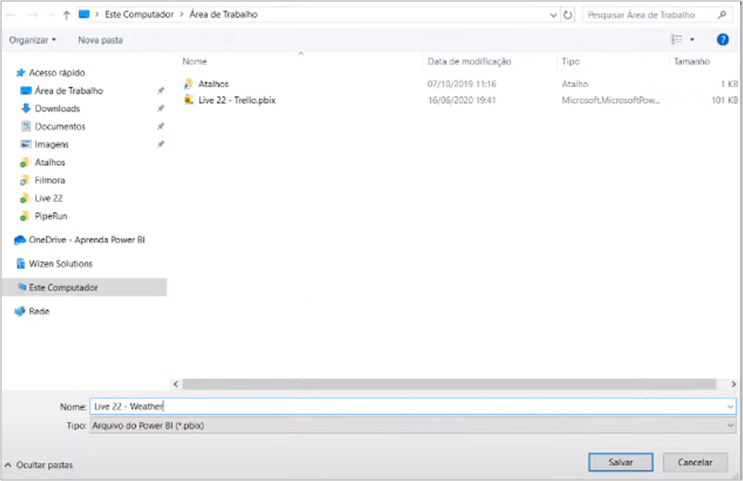
Image 63: Saving the file
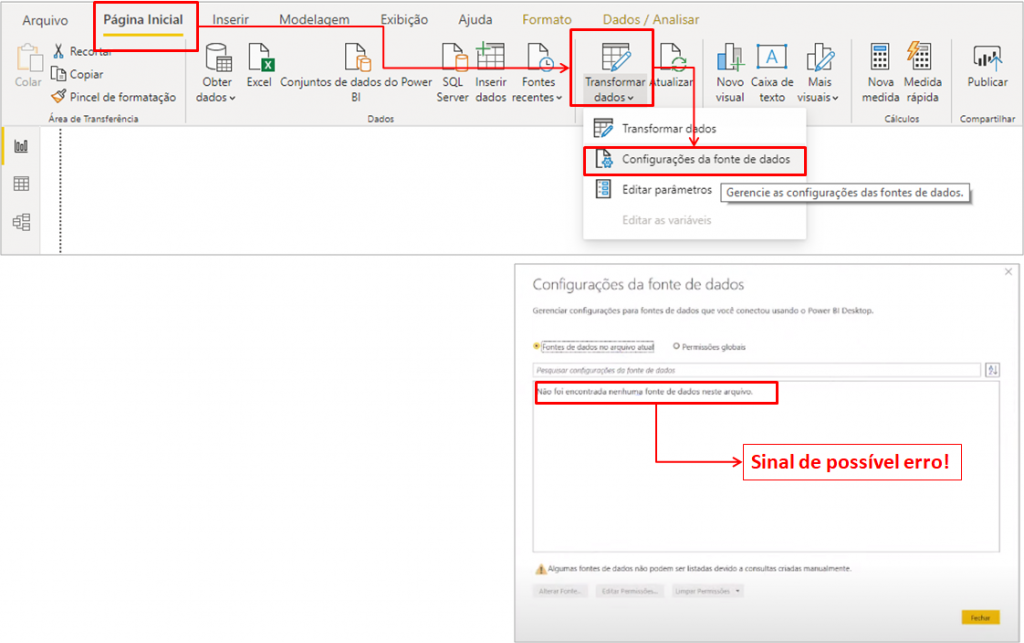
Image 64: Checking the data source settings
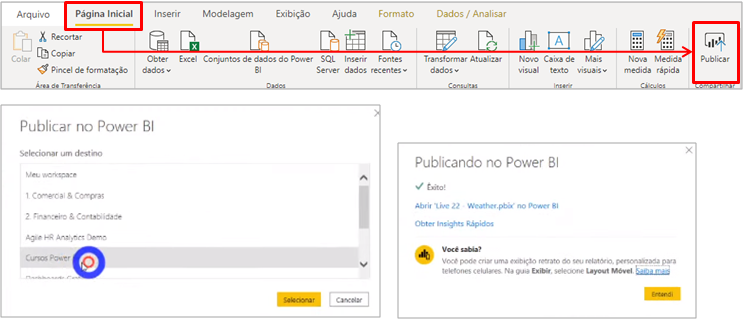
Image 65: Publishing the file
Steps:
1. Salve the file
2. In "Home" click on the arrow under "Transform data" → Click on "Data source settings"
3. In "Home" click on "Publish" → Choose the workspace
In the Power BI Online environment, let’s check how the API works:

Image 66: Entering the data source credentials environment
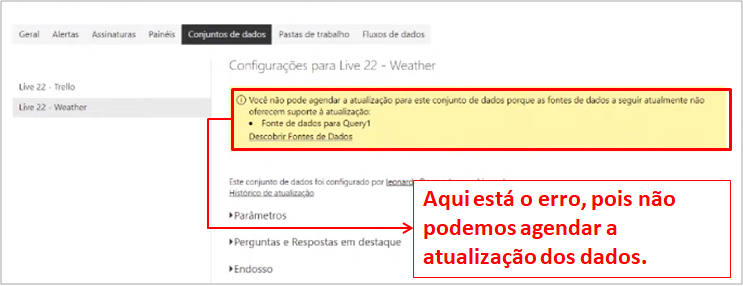
Image 67: Error, we can’t schedule the data refresh
Steps:
1. Select the workspace → Select "Data source + data flow" → Click on "Schedule refresh"
2. Verify that the refresh can't be scheduled
The way out here is to go back to our GetWeather function in Power Query and use Relative Path:

Image 68: Editing the GetWeather function
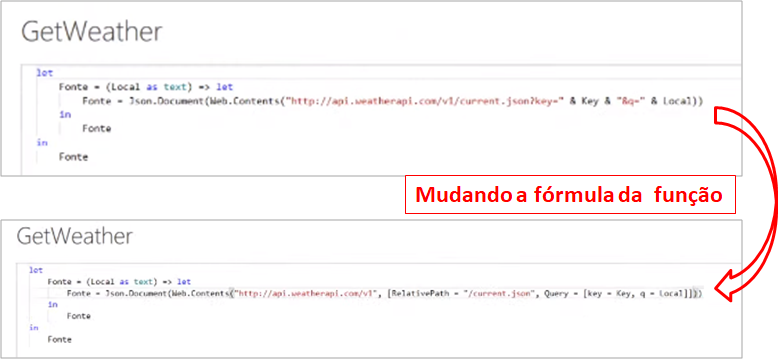
Image 69: New function
Steps:
Click on "Advanced Editor" → Change the formula
Formula:
= (Local as text) => let
Fonte = Json.Document(Web.Contents("https://api.weatherapi.com/v1", [RelativePath = "/current.json", Query = [key = Key, q = Local]]))
in
Fonte

Image 70: Result without errors
To make it work in Power BI Online, you must: update the file, save and publish again. That done, just refresh the same page that were in Power BI Online:
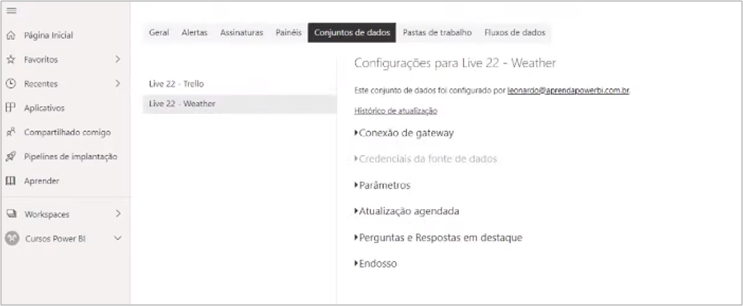
Image 71: Now the scheduled refresh is allowed
The last step is to assess the test connection. Let’s open the credentials:
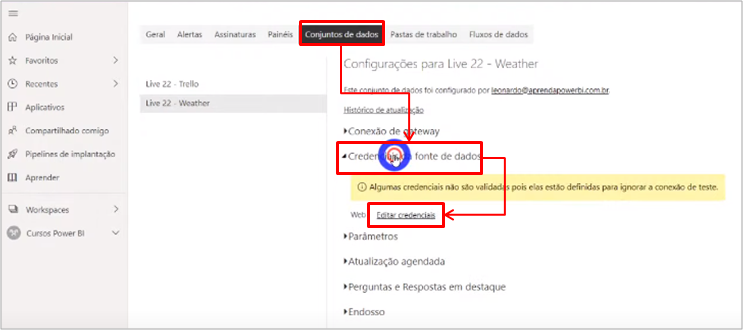
Image 72: Edit Credentials
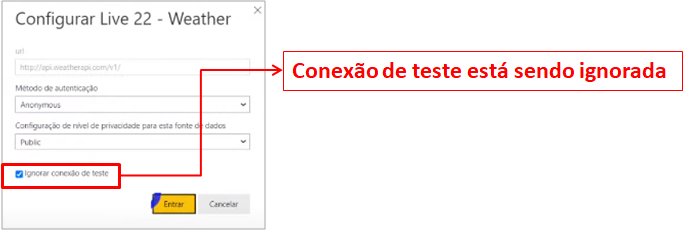
Image 73: Teste connection ignored
Steps:
Refresh the Power BI Online page → Click on Data source credentials → Click on Edit credentials
This option is new in Power BI Online! If it were the old way, we would have a problem with the refresh. What happens here is that Power BI tests our Base URL (https://api.weatherapi.com/v1) if this box is unchecked. We will access our Base URL in the browser to see the return:
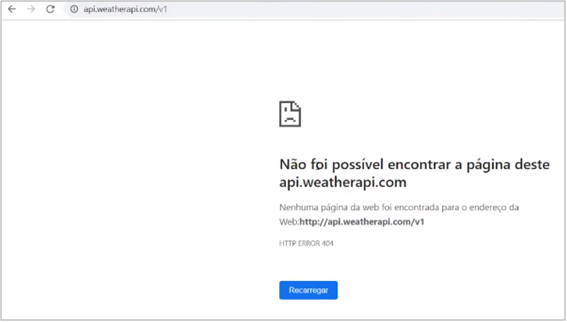
Image 74: Test with the Base URL
The page access return is error 404, let’s test in Power BI Online by unchecking the option to skip the test:

Image 75: Refresh error
Well, now what? What to do? Easy, we still have to work on the GetWeather function formula. Let’s test the URL https://api.weatherapi.com in the browser:

Image 76: URL test
Good, we have a positive return! So, what if we test this URL as the basis of our function? We have a possible solution:

Image 77: GetWeather modification
Steps:
1. Test Base URL on the browser
2. Test the test connection
3. Test new URL on the browser
4. Change the GetWeather formula
Formula:
= (Local as text) => let
Fonte = Json.Document(Web.Contents("https://api.weatherapi.com", [RelativePath = "/v1/current.json", Query = [key = Key, q = Local]]))
in
Fonte
Again, update the file, save and publish to Power BI Online! At Power BI Online, let’s make the test connection:

Image 78: Teste connection working
Success! Our authentication working and ready to schedule the refresh!
CRM PipeRun (Postman)
CRM Piperun is a very interesting, lightweight and practical system for sales funnel controlling. To access their database, we also use APIs. However, unlike Trello and WeatherAPI systems, authentication is done through a Token passed in the Header (hence the need for Postman). Well, let’s go to the example and you will understand better.
| Tip: For more information about CRM PipeRun , access the link: https://crmpiperun.com/ |
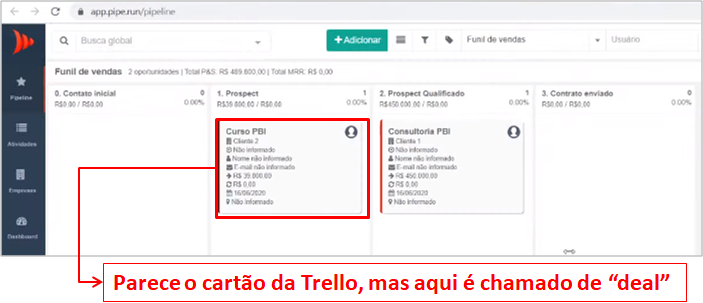
Image 79: Account Home Page
Just like we did for other examples, let’s look at their API documentation and find out how to make the calls:
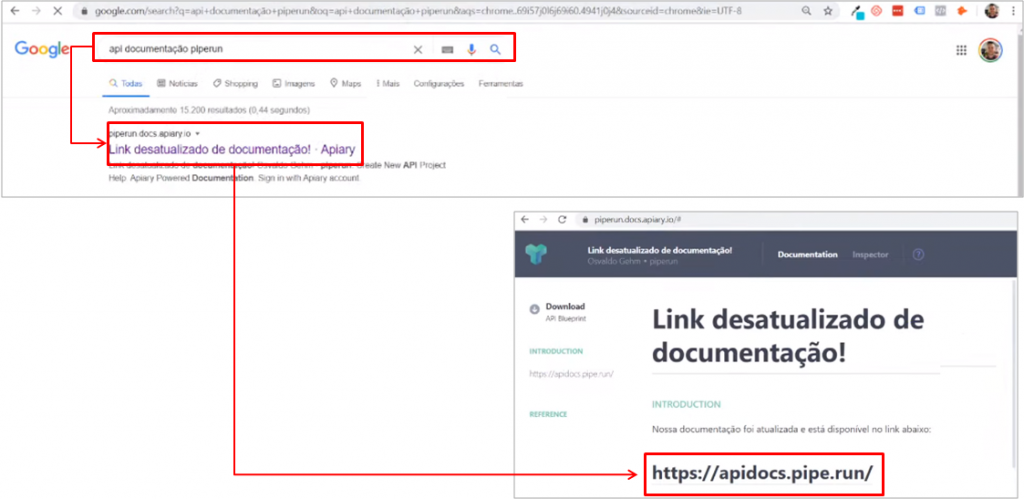
Image 80: Accessing the API documentation
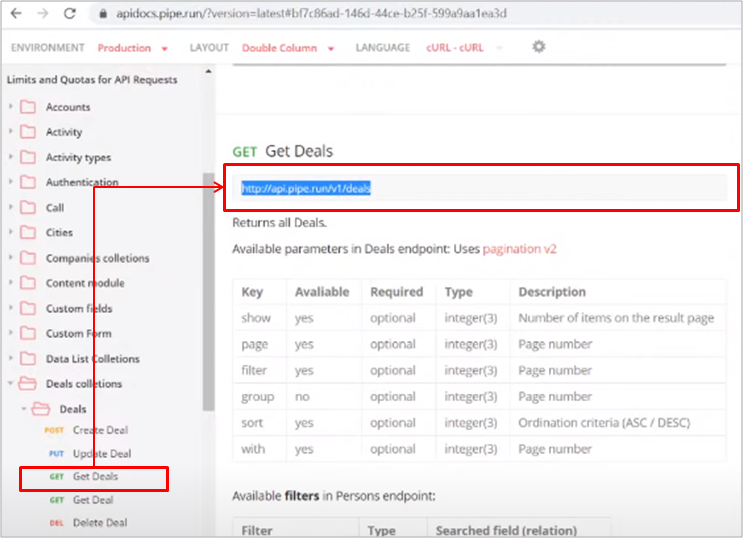
Image 81: Getting the deals call
Steps:
1. Search for "piperun documentation api" in the browser → Click on the first link → In the tab that opens click on the new link
2. Select "Get Deals → Copy the call
Call:
https://api.pipe.run/v1/deals
Well, what do we do with this call? We test it …. and for that we paste it in the browser:

Image 82: Unsucsseful test
To test the CRM PipeRun call, we need to use Postman (unlike Trello and Weather API):

Image 83: Access to Postman

Image 84: Testing the call
In addition to the call, we need the Token that we will obtain on the website:

Image 85: Obtaining the Token in the website

Image 86: Structure for Request in Postman
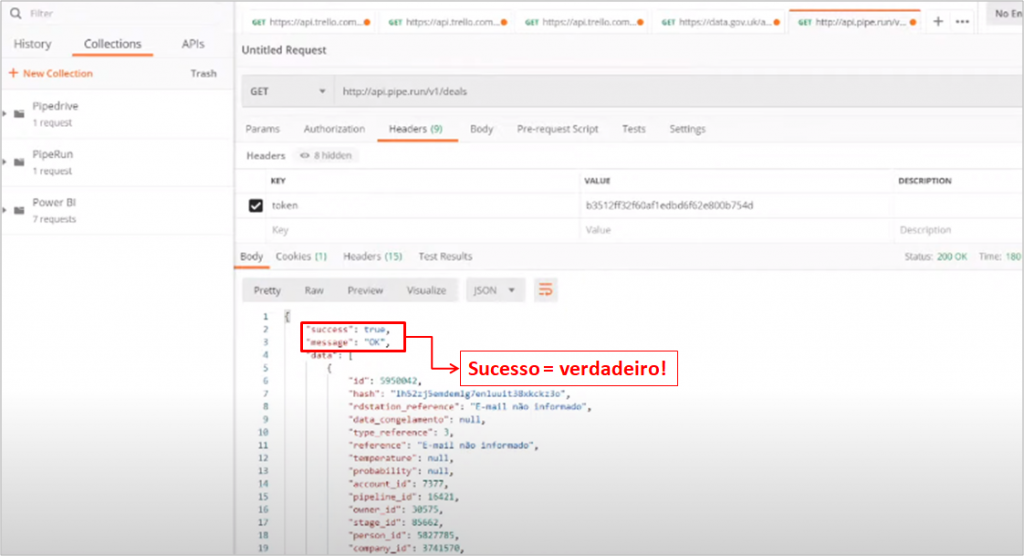
Image 87: Header and call tested
Steps:
1. Copy the call in the browser
2. Open Postman → Paste the call → Click "Send"
3. Access the "Central de Integrações" (Integration Central) on the CRM PipeRun website → Copy Token
4. In Postman, click on "Headers" → Fill in th "Token" in Keys and inform the value in "Value"
With the authentication tested in Postman, we can move on to the next step. Let’s get data in Power BI in a new file:
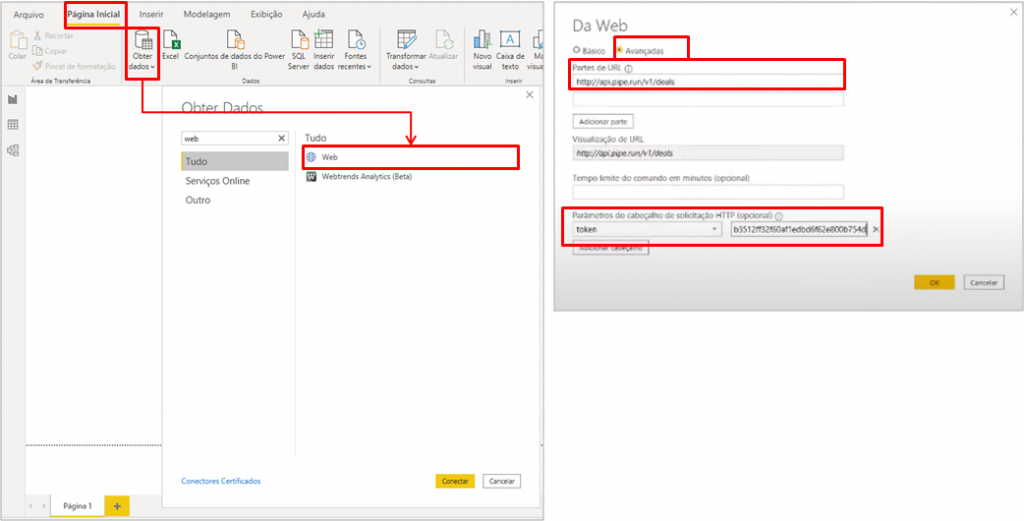
Image 88: Getting data in Power BI
Steps:
In "Home" click on "Get Data" → Select Web → Select "Advanced" → Insert URL, token and the token value
In the Power Query environment, we have something similar to the other cases:

Image 89: Query in Power Query
Now I’m going to test a possible Base URL that works in the browser, so I don’t have any problems with a test connection in Power BI Online. First I will test for https://api.pipe.run/v1:

Image 90: URL Test
It didn’t work, let’s test https://api.pipe.run:

Image 91: URL Test
It worked! Great, we already have our Base URL to build the formula. Let’s add the Relative Path:

Image 92: Change in formula
Steps:
Change the source formula
Formula:
= Json.Document(Web.Contents("https://api.pipe.run", [Headers=[token=b3512ff32f60af1edbd6f62e800b754d], RelativePath = "/v1/deals"]))
Shall we expand to verify the information?
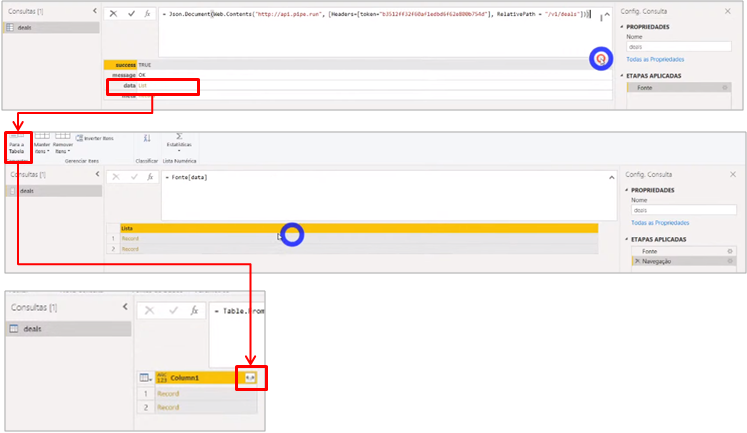
Image 93: Expanding the query
Steps:
Click on "List" → Click on "Convert to table" → Click the button to expand in the right corner of the "Column1" column

Image 94: Expanded table
Cool, we have the result of the table with the two deals (Consultoria PBI and Curso PBI) from the CRM PipeRun website. Test time! I’ll create a deal there on the website and refresh Power Query:

Image 95: Deal creation

Image 96: Power Query refreshed
Finally, let’s create the parameter for the Token and insert it into the source formula:
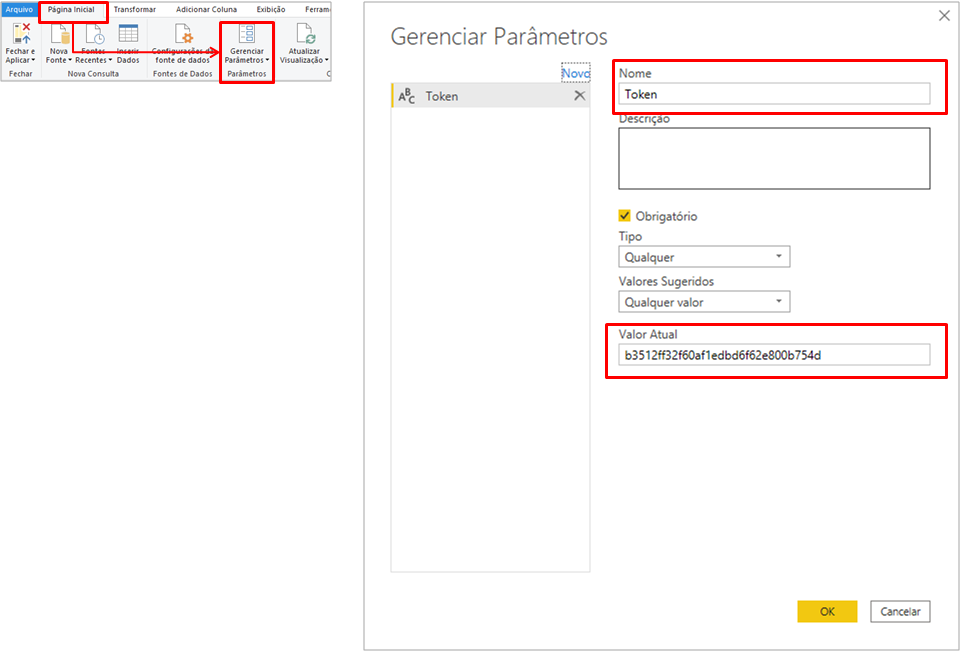
Image 97: Parameter creation
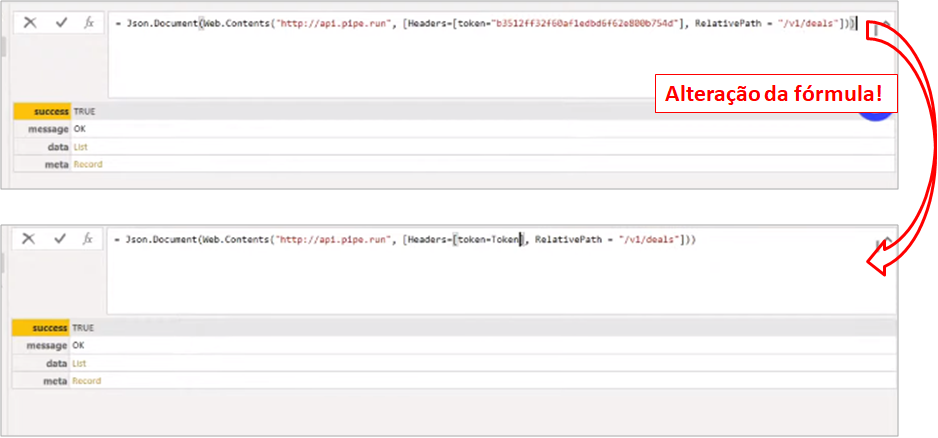
Image 98: Formula change
Step:
1. Create test deal in theCRM PipeRun website
2. Refresh Power Query
3. In "Home" click on "Manage Parameters" → Change name, type and value
4. Change source formula
Formula:
= Json.Document(Web.Contents("https://api.pipe.run", [Headers=[token=Token], RelativePath = "/v1/deals"]))
Tips: Pagination and Relative Path
Pagination is a topic that I manage to develop, but I still don’t feel comfortable in a didactic way. For this matter I prefer to recommend the material I use to solve the problems I have in projects.
Find below some support links for pagination:
As to Relative Path and connection test I recommend Chris Webb, who in my opinion is the person who most understands the subject in the community:
Guys, thank you to those who followed along until the end of the post !! This subject is very dense, and I had to try my best to be able to share it with you on Live # 22. It is really complex.
Hope I have made it clear and that you learned from it. My suggestiong for knowldge fixing is to go back to the topics where where you struggled, reread, access the pages I recommended at the end of the post and try understand the details. And of course, practice a lot !!!!! Much of what I did here you can replicate by creating test accounts on the websites.
Thanks everyone!
Regards,
Leonardo


